Tuesday, 29 April 2014

Homemade Salmon Fish Fingers with a Light Mayo Tartar Sauce

I have made these fish fingers before and decided to revamp the recipe a bit with a new photo and enthusiasm. I made these with salmon but you could use any type of fish. I'd like to stress that the reason I like making these isn't just because I like to make everything home-made, but more because I can't stand the thought of how vile leftover fish bits reformed into a perfect little square or rectangle can be. Sure there is some fish fingers that are decent, but if you can cut out some processed items you might be better off. We all know that things made at home just taste better. Sometimes people stray from making things at home because it sounds too difficult or they can't be bothered. This dish from start to finish was 40 minutes tops! Of course I'm a massive multi-tasker and completely organized so I bet that shaved five minutes off the time but it was totally worth it, and I am totally excited that my old recipe was just as good as I thought it would be! This serves two, as I always cook for two but can be easily doubled or trippled. Salmon Fish Fingers

Ingredients:
200g boneless skinless salmon
100g breadcrumbs
50g flour
20g finely grated parmesan cheese
2 egg whites
Salt and Pepper
parsley and dill (optional)

To Start:
Preheat oven to 200C.
Get three bowls/plates out.
Salmon Fish FingersOne with flour, salt, pepper and herbs.
One with breadcrumbs, herbs and parmesan.
One with egg whites, beaten until lightly fluffy.

To Finish:
Cut the salmon into 8-10 1in strips.
Coat a few at a time in the flour, then into the egg, then into the breadcrumbs and place on a lined baking tray.
Continue until you've used all of your fish.
Bake for 30 minutes or until golden brown.
Enjoy!

For The Light Tartar:
3 tbsp. Lighter than Light Mayo
squeeze of lemon juice
1 tbsp. capers
1 tbsp. chopped gerkins

Mix together, seasoning to taste and voila!

Friday, 25 April 2014

Caramelized Red Onion and Mature Cheddar Portobello Mushroom Quiches

I was thinking the other day that I don’t particularly love mushrooms, even though I generally use them quite a lot. I tend to try to think of other ways to use ingredients I don’t particularly like. I got a tip from a few websites and read no further, I decided to just try on my own. I’m not particularly brilliant with quiche either. But I decided to give it a go. They came out absolutely amazing! So yummy, and for me a great way to use a Portobello! If you give this a try I guarantee you that you can come up with something fantastic and imaginative with the ingredients. I decided to go for a simple vegetarian cheddar and onion, but the possibilities are endless! I can even vouch that these are extremely healthy and low fat and low carb. I don’t generally cut out carbs but when it’s this good why not? This is for 2 people and could be easily easily doubled, and perfect for lunch, or a impressive brunch!
Mushroom Quiches

Ingredients:
3-4 large portobello mushrooms
2 eggs
½ c. milk
1 red onion
50g frozen spinach thawed (optional)
30g grated mature cheddar
Salt and pepper to taste
1 tsp. sunflower oil

For the Accompanying Salad:
2 salad tomatoes
½ cucumber
Handful mint and coriander
Red wine vinegar

To start:
mushroom gills removedPreheat oven to 180C
Heat a pan with the oil.
Dice your red onion finely and add it to the oil stirring frequently and remove from heat when caramelized.
Begin to clean out the mushrooms, remove stem and use a spoon to scrape out the gills, until you have nice little ‘bowls’.
mushroom gills removed layered with spinach and red onion
To Finish:
Mix the eggs and milk with salt and pepper until frothy.
Place spinach, the caramelized onion and a bit of cheese on the bottom of each mushroom.
Top with the egg mixture. (This can be tricky as some mushrooms are split and might have spillage, take care to lean them up against something so it doesn’t leak out).
Place in a hot oven for about 30-45 minutes depending on your oven.

For the Salad:
Slice the onion very thinly and soak in a few dashes of red wine vinegar.
In a separate bowl combined cubed cucumber and tomatoes, and salt liberally.
Chop the herbs, and then combine all of the ingredients and it is ready to eat.

This recipe was brought to you by the onion challenge at The Spicy Pear , and Citrus Spice UK

Monday, 7 April 2014

Yogurt and Mustard Marinated Pork Tenderloin

Pork tenderloin is one of those things that some are often scared of cooking. I have been scared before I won’t lie. I’ve overcooked countless tenderloins, even though I own a digital meat thermometer. I decided I would try again and give another approach. I have always taken inspiration from Indian cooking and this case is no different. The technique of marinating the meat in yogurt I’m really familiar with because I often spatchcock chickens and marinade it in yogurt frequently just like tandoori. It always comes out completely succulent and delicious. This was no different with the pork tenderloin and it’s one of my favourite recipes now. It’s versatile and you can mix it up with the spices and try new things. Hope you try it!
aromatic spiced yogurt mustard marinated pork tenderloin
Crusted with aromatic spices for extra flavour!

Ingredients for the Spice Mix and Marinade:
1 tbsp. coriander seeds
1 tsp. cumin seeds
1 tsp. fennel seeds
1 tsp. mustard seeds
1 tsp. pink peppercorns
1 c. bread crumbs
½ c. fat free yogurt
Sea salt
2 tbsp. Maille Dijon mustard
1 pork tenderloin 400g

To Start:
coriander,fennel,mustard,cumin,pink peppercorn spice blend.In a mortar and pestle mix all of the whole spices with a few pinches of salt and grind it up until you have a chunky blend.
In another bowl mix the yogurt and mustard.
Take your pork out of the package and pat dry with a kitchen towel and roll in the yogurt and mustard; return it to the fridge for about 15 minutes.

To Finish:
Preheat your oven to 220C
Mix your crushed seeds with bread crumbs and lay flat on a round plate. (If you want to make your own see below)
When your oven has preheated take the loin out and scrape a little excess yogurt, mustard off.
Roll your tenderloin in the breadcrumb spice mixture.
Place on a baking tray and bake for 10 minutes and then turn the temperature down to 175 for a further 30 minutes.

Note:
*Cooking times will vary for the size of your pork.
*If you haven’t got your own bread crumbs prepare them by blending in a food process 2 slices of bread, and a few leaves of rosemary.

Thursday, 3 April 2014

Skillet Salsa Eggs

I was going to call this Mexican eggs, but it ended up being almost exactly like huevos Rancheros, but not enough to be called huevos rancheros. So salsa eggs it is! This is more or less something I remember from my childhood. I don’t know where this dish comes from in my mind, but it’s a simple pleasure that strikes a very familiar chord with me. I don’t remember eating a lot of bacon growing up, except at some certain friends’ houses. My mom did always fry up some fresh tomatoes with chillies and put it along with eggs, and perhaps this is where it came from. Either way, in all practicality, it’s a hell of a way to have a hearty Sunday breakfast to cure any heavy night out previous. With its simple ingredients, all you need is a tortilla to sop up the goodness. Enjoy! This recipe is for two people, the tomato sauce can handle a couple more pieces of bacon and two more eggs before you crowd the pan too much!
Salsa eggs and bacon in one skillet!
Salsa, eggs, and bacon all in one pan!

Ingredients:
4 unsmoked bacon rashers ( you can use smoked )
4 eggs
1 tin of chopped tomatoes
½ green pepper
1 chilli
1 small onion
1-2 cloves garlic
2 pinches cumin
Coriander and cheese for garnish
Half can of water
Large sauté pan with a lid (non-stick preferably)
Oil if you’re not using non-stick

To Start:
Get a large sauté pan hot.
Dice the green pepper, onion, chilli and garlic.
Add the bacon to the pan and crispen up, about 1 minute.
Next add the green pepper onion chilli and garlic, stir frequently.
When the vegetables become fragrant add the tinned tomatoes and half a can of water.
Bring to a rapid boil and simmer for about 5 minutes.

To Finish:
When the veggies are soft, season with salt and pepper and cumin.
Make a little hole for the eggs by pushing aside the sauce.
Drop four eggs in the pan and turn the heat down to low and cover.
The eggs should be wobbly at the top and white.
All you need to do is top it with some queso fresco, or feta for those who can’t get it, and some coriander (cilantro).
Enjoy!

Friday, 28 March 2014

Banana Raisin Bread

I’ve stated before I don’t really like bananas. But I buy them every single week. Why? I don’t have a clue! Well I do know, sometimes when they’re good, they’re REALLY good. So I get them and my husband has his pick over the fruit and usually takes my unwanted bananas. This week I’ve found myself with a lot of extras, so as I’ve stated before in my banana using recipes, I need to use them up fast. What better way than banana bread. I really love banana bread and have blogged several recipes. This one I took no inspiration from any other recipes and used up what was in my cupboard. I had some mixed dried fruit leftover from the hols and I decided to dump that in, and it turned into a really yummy bread! Perfect for a cup of tea, this is my kind of sweet. I labelled it ‘banana raisin bread’ because the dried fruit mix I used has raisins in it but in addition it also has dried dates, currants, and mixed dried citrus peel. I suspect this recipe would be a great base for any additional dried fruits like cranberries or blueberries. Have a go! This makes about 12-18 slices, depending on how you like your bread!

Ingredients:
2 c. plain flour
1 ½ c. granulated sugar
4 very ripe bananas mashed (about 1 ½ c.)
3 eggs
1 tsp. baking powder
½ tsp. baking soda
1 ½ c. dried fruit with mixed peel
¼ tsp. salt
1 tsp. vanilla
½ tbsp. orange zest (or very finely chopped orange rind)

For the Bread:
Heat oven to 185C.
In a large bowl, mash all the banana, and then mix with the sugar, eggs, vanilla, and salt.
Next sift in the flour, baking powder, and baking soda.
Mix thoroughly.
Next fold in your dried fruit and orange zest (if you’re using it).
Grease a loaf tin and bake for 30m-1hr. Depending on your oven check it every 15 minutes after the first half hour.
Enjoy!

Monday, 24 March 2014

Smoked Salmon Deviled Eggs

Deviled eggs are a classic party food, and these I decided to make with a very simple twist. For those of you who don’t frequently eat deviled eggs they’re a tiny bit of joy into the mouth. Hard boiled eggs, with the yolk taken out and mixed with mayonnaise or any other types of ingredients and fill them back in the half white shells. They’re perfect for any occasion, such as picnics, BBQs, holidays and gatherings. They’re so versatile too; you can use this recipe to jump into something more adventurous. The sky is the limit really because so many things go with eggs. My recipe here is for 12, but you can easily do more as I’ve found at so many gatherings I’m often left with none! Spring is coming up and it’s a perfect time to give it a go!
Smoked Salmon Deviled Eggs
Perfect treat to impress guests!

Ingredients:
6 hard-boiled eggs
5 tbsp. extra light mayo (I use Hellmann’s)
100g smoked salmon
1 tsp. Dijon mustard
Salt and pepper to taste
Garlic powder
Paprika for dusting

To Start:
Peel the eggs, slice carefully in half and remove the yolk and place into small bowl.
Arrange the egg white halves nicely on a platter.
Dice the salmon into very small pieces

To Make:
Mix the yolks thoroughly with a fork to break up any lumps.
Add the mayo and the Dijon and mix thoroughly. (A hand blender works fantastic here).
Salt and pepper to taste with a dash of garlic powder.
Fold in the smoked salmon and mix to incorporate.
In a piping bag carefully add the mixture and pipe into the egg whites.
Alternatively you can spoon it in as well.
Refrigerate covered in cling film, eat on the same day.

Friday, 14 March 2014

Guinness Chocolate Cupcakes with Baileys Buttercream Icing

I am always trying to keep up with the seasons by buying seasonal items, as well as making recipes for holidays and giving people tips for entertaining. Today I decided to celebrate Irish heritage and searched through loads of recipes. I had a chocolate cake in mind and I wanted to incorporate Guinness. I think I have seen Guinness chocolate cake on a menu once. So I searched through many recipes and combined them into my own. I must say this is one of the best chocolate cake/cupcake recipes I’ve ever made on my own. I have no idea where these recipes started from but the base idea is the same. I tweaked it to fit my own needs and you should make it and see how it goes! I also decided “Hey, if I’m getting Irish, I might as well make something with Baileys! Right?” I thought it was a great idea. I have no idea how to really make buttercream but I went on my instincts from watching my mom make icing and it really worked. Came out really good! I encourage anyone to try this for St. Patty’s Day or for any occasion you want to impress. This recipe makes 12 cupcakes but can easily be doubled for a larger group. Oh and if you omit the Baileys in the icing it would be appropriate for children, but as the recipe goes they’re for adults. Enjoy!

*Note: For all my American readers, it’s really hard for me to convert this recipe into US measurements, I suggest you get a scale, or if you’re in a pinch, message me on my Facebook page and I can walk you through it in US measurements.
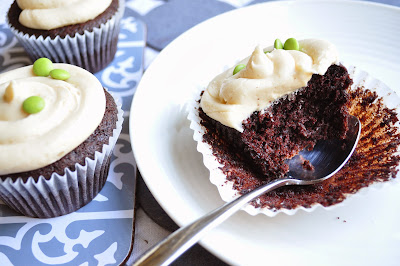
Guinness chocolate cupcakes with Baileys buttercream
Very light and fluffy.

Ingredients:
125g unsalted butter
125g self-raising flour
100g dark brown soft sugar
50g Silver spoon Half Spoon (If you don’t have this use 100g granulated white sugar)
50g Green & Blacks Cocoa powder
½ tsp. baking powder
½ tsp. baking soda
¼ tsp. salt
1 tsp. vanilla
1 large egg
75ml non-fat yogurt ( I used Yeo Valley)
125ml Guinness draught

For the Icing:
55g unsalted butter room temperature
200-300g icing sugar
3-5 tbsp. Baileys Irish Cream Liqueur

To start:
Heat an oven to 175C or 350F

Guinness chocolate cupcakes with Baileys buttercreamIn a medium saucepan combine, butter, brown sugar, Guinness, cocoa powder and vanilla on a low heat until the butter and brown sugar is melted – do not boil. Take off heat and leave to cool slightly.
In another big bowl, sift together flour salt, baking powder, baking soda, and salt.
Slowly pour the liquid into the dry ingredients and stir to combine until smooth.
Next add the egg and yogurt and stir well until combined and no lumps.

To Bake:
Line 12 muffin cups and pour the batter in evenly through the cups.
When the oven is hot place them in the middle and bake for 20-25minutes.
At about 20 minutes check them with a tooth pick, if it doesn’t come out clean cook for a further 5 minutes.
These cupcakes are REALLY soft and will feel uncooked.
Take them out and leave them to cool completely before trying to eat them or ice them.

To Finish with Buttercream and Ice:
You can do this while the cupcakes are baking.
There really isn’t an easy way to explain this; it’s a bit of trial and error getting the mixture right.
The idea is to mash all the butter until soft and have it absorb the sugar a little at a time.
When the butter has absorbed some sugar, add a little bit of Baileys, then more sugar then repeat until you have a good thick consistency and enough icing for your cupcakes.
These measurements did my cupcakes no problem.


Wednesday, 12 March 2014

Lemon and Stem Ginger Coconut Macaroons

I’ve had this coconut lurking around in my cupboards and I’ve been wondering what to do with it. Then I realized, why not make macaroons? I absolutely adore them, but how can I make them better? As I was looking around in my cupboard, as this is how most of the recipes I make transpire, I found some crystalized stem ginger. What a fantastic idea I thought! Lemon, coconut, ginger; what could go wrong? Nothing! These were absolutely delicious; I really enjoyed them even though the texture of the coconut isn't exactly like it is back home. We have a shredded coconut which tends to be longer and isn’t so chopped up as desiccated coconut. These none the less were delicious, and go perfectly with a cup of tea. These are very simple and yield about 12. If you can’t find crystalized ginger you can easily grate one tsp of ginger in. Enjoy!

Ingredients:
150g desiccated coconut (about 1.5c shredded)
100g caster sugar (½ c. fine sugar)
100g crystalized stem ginger chopped fine
1 tbsp. ground almonds
2 egg whites beaten very soft peaks
Zest of one large lemon

To Start:
Lemon and Ginger Coconut macaroons.Heat oven to 180C (375F).
Measure out coconut and almond flour and mix thoroughly.
Dice the crystalized ginger finely and zest the lemon. Mix in with the coconut and almond flour thoroughly.
In another bowl whip the egg whites until just light and fluffy, not looking for stiff peaks, just some froth.
Slowly add in the sugar a little at a time.
Fold in the coconut, almond flour, ginger and lemon zest a little at a time and mix thoroughly.

To Bake:
With two spoons form the balls and place them on a wax paper lined baking tray.
Bake for about 20 minutes or until lightly toasted and brown.
Cool completely before removing from wax paper.

Monday, 10 March 2014

Mom's Peach Pudding

I've previously posted this recipe, and I decided to make it again over the weekend and change make sure the measurements were good. They're great! This is one of my favorite dishes that my mom makes. Most importantly this is the only dish she makes that I can replicate with complete confidence that it will taste like the real thing. It’s very simple to make and can feed up to 6 people but I guarantee you they’ll want more! Try it out, it’s fool proof and you won’t regret it.


peach pudding
Serve it hot with ice cream!
What you’ll need In Two Parts:
¾ c. sugar
½ tsp. salt
1 tsp. baking powder
¼ tsp. cinnamon
1 c. flour
4 tbsp. butter melted
½ c. milk
3 cans sliced peaches drained or equivalent fresh peaches or frozen (be approx.)

To start:
Drain the peaches and spread out on the bottom of a baking dish.
Mix the butter with the sugar until well incorporated.
Next add the flour, cinnamon, salt, baking powder and milk; mix until well combined.
Spread this mixture on top of the peaches. As evenly as you can but it doesn’t have to be perfect.

Next you’ll need:
fresh out of the oven
MMM Fresh out of the oven!
½ c sugar
1 tbsp. corn starch (corn flour)
¼. Tsp. salt
½-1c. boiling water

To combine:
Mix the sugar, salt, corn starch together in a bowl and sprinkle on top of the peaches and batter. (You don’t have to use all this mixture, but a generous amount).
Next pour 1 c. boiling water over the top of the whole pan. (If 1 c. looks like too much water cut it down according to your pan size).
Bake in the oven at 180C (350F) for about 50 minutes until bubbly and golden brown!
Serve HOT with vanilla ice cream!!

Friday, 7 March 2014

Halloumi Stuffed Peppers with a Spicy Tomato Sauce

I love a good vegetarian dish for supper as well as a good Moroccan spiced dish. This fortunately combines both! It’s fairly easy to put together as well, but once it’s together you shove it in the oven and forget about it. There are also a million things you can do with the couscous stuffing. You can eat it as a side by itself or stuff it into a chicken or lamb roulade. You could also integrate other ingredients; the options are endless! I made this dish to serve as a main course for two people making 4-5 peppers. It can easily be a side dish as well, just up the ingredients a bit.
Couscous and Halloumi stuffed peppers with a tomato sauce
Light lunch, dinner or a side dish!

Ingredients:
1 400g tin of tomatoes
2 medium onions
75g dried whole wheat couscous
225g block halloumi
4 large peppers
3 cloves garlic
50g dried dates
50g dried pistachios
2-4 tbsp. ras el hanout rub
Salt and pepper to taste
1 tsp. olive oil

For the Sauce:
Dice one onion and chop garlic.
In a saucepan combine tinned tomatoes, onion, garlic, and 1-2 tbsp. ras el hanout.
Bring to a boil and let it reduce until the onions are soft, about 10 minutes. (You might need to add half can of water)

For the Couscous:
Dice the other onion and garlic.
Slice the dried dates and pistachios.
In a small pan heat the oil and fry the onion, garlic, and dates until soft.
At the end add the pistachios and take off heat.
In a bowl mix the dried couscous with the friend onions, garlic, dates, and pistachios.
Pour about 250ml boiling water on to the couscous, cover with cling film and set aside.

To Assemble:
When the sauce is done take off heat.
Cut the tops off the peppers and remove seeds and veins.
Cut the halloumi in about 24 chunks (six pieces for each pepper)
Place a ladle of sauce at the bottom of the dish.
Place halloumi in each pepper arranged so you can still fill with the couscous mixture.
By now the couscous should be rehydrated and ready to fluff and fill. Use a large table spoon to fill each pepper evenly and repeat for all of the peppers.
Pour the rest of the sauce over the peppers.
Cover with foil and bake for about 45mins-1hr at 180.
Enjoy!

Tuesday, 4 March 2014

Turkey Escalopes Stuffed with Spinach and Cream Cheese

I’ve wanted to stuff some meat for a long time! Escalopes are the perfect medium for that, and you can easily use pork, chicken, and beef would go especially nice with this recipe. I used turkey in this particular recipe but like I said, anything will do. I couldn’t quite get them to ‘roll’ like a roulade, but I ended up just pounding the fillets out and folding them in half and baking them with a tooth pick (soaked of course so they won’t burn). I love these and I hope you do too. You can also use this as inspiration for finding fillings of your own. This recipe serves 2-4 depending on how hungry you are!
Turkey escalopes stuffed with spinach and cream cheese.
Serve with any dipping sauce you'd like! I like cranberry.

Ingredients:
350-500g turkey escalopes of similar size
75g extra light cream cheese
150g frozen chopped spinach defrosted and drained thoroughly
½ diced red onion
½ red pepper sliced thinly
1 garlic clove crushed
½ tbsp. light olive oil
Salt and pepper to taste

To Start:
Soak about 6 tooth picks in water.
Heat the oven to 200C.
In between two pieces of wax paper or cling film, pound out the escalopes until thin.
Heat a large pan with the oil until smoking hot.
Season the escalopes and pan sear on one side in the hot pan, only to get color but not to cook through.
Remove from pan and set aside.

To Assemble and Cook:
Mix the spinach, cream cheese, crushed garlic, and red onion together in a bowl.
Spread a layer onto the flat escalope, top with a few slices of thin red pepper.
Fold over and secure with a tooth pick.
Bake in a hot oven for about 45 minutes.

Thursday, 27 February 2014

Bananas Foster Pancakes

Anyone that knows me knows I don’t really love bananas. It takes a certain type of banana to catch my eye, and when it does, it’s a rare event. I usually only like bananas right when they've turned yellow, and this often leads to waste. On one incredibly hungry evening I was searching my cupboards high and low for something sweet to eat! The only thing I had was a very ripe banana! YUCK! There’s nothing I dislike more than an old brown piece of fruit. It’s decaying  and dead in my eyes! Anyways, this was the recipe I came up with on that night. I previously have blogged about it, but I wanted to revamp the photo and revisit the ingredient list and make sure it was on point. In light of Shrove Tuesday around the corner it seems to be a perfect dish for me then and now. I use orange liqueur instead of rum because, well because I like it better. This is a great way to use up old eggs, milk, or EVEN BANANAS!  These are what I would assume are British pancakes, very unlike the American fat fluffy kind, but thin and crepe-like. This serves 2, but you can easily double it for more! 


Delicious with hot custard, cream or ice cream!
Ingredients:
55g plain flour
130ml milk
1 egg
1 tbsp. butter
Tiny pinch of salt
2 large ripe bananas, sliced
4 tbsp. caster sugar
1-2 tbsp. butter
2 tbsp. Gran Marnier (could use Brandy or Cointreau)
Cream, ice cream or custard to serve

To Get Started on the Pancakes:
Sift flour and salt into a bowl.
Add the egg and half of the milk, and whisk lightly with a fork, slowly adding the remaining milk until thoroughly mixed and smooth.
Melt the butter in a large non-stick pan.
Swirl around until the bottom is covered, pour half of the melted butter into the batter and set the rest aside for greasing.
With a small ladle, pour batter fast and as close to the pan you can, swirl it out to create a perfect circle.

Each side will take about 2-3 minutes or until they lift from the pan easily.

To Make the Bananas and Assemble:
In a hot pan add the rest of the melted butter, and the sugar. 
Let it sit until the sugar starts to melt and caramelize, about 3-5 minutes.
When the sugar turns sticky and brown, add the sliced bananas and cinnamon; coat with the caramel.
Stand well back and turn off the heat, douse the pan with the alcohol and stir rapidly to evaporate the alcohol.
Handle with care and scoop spoonfuls into pancakes and wrap them up.
Top with ice cream and cinnamon for garnish.
Enjoy!

Monday, 24 February 2014

Southern Corn Casserole

First of all, let me start by giving many apologies for not blogging recently! Life has gotten quite busy and is always throwing me new twists and turns. Sometimes things get neglected but hopefully I will be back with enough inspiration to keep everyone’s interests up!

This is a recipe for corn casserole, ever heard of it? It’s a southern thing similar to cornbread but much more moist. I took inspiration from several recipes for this one. I was craving cornbread but one with much more of a light almost soufflé type feel. I dove right in and tried my hand at it without a recipe and I think it came out brilliantly. The great thing about this recipe is that it was made completely with your waist in mind. It’s a very low calorie dish with about 150 calories a portion. Give it a try! It makes an absolutely lovely accompaniment to roasted meats, buffalo wings, and I also split it in half and put it under the grill and served it with a poached egg on top for breakfast. Really delicious! This makes 8 servings. Enjoy!

You can use any type of cheese you want.
Ingredients:
100g yellow cornmeal (or polenta if you have it)
100g plain flour
20g silver spoon half spoon (if using regular sugar use 40g)
160g tinned sweetcorn drained (frozen will work if thawed)
1 400g tin of Green Giant cream style corn
½ c chopped onion
2 chillies – green or red for colour
3 egg whites whipped slightly
150g fat free natural yogurt
100g grated light cheddar
1 tsp. baking powder
½ tsp. baking soda
½ tsp salt
½ tsp. garlic powder
Spray oil.

To start:
Preheat oven to 180C or about 375F
First things first, in a non-stick pan, spray with a few sprays of oil and warm it up.
Dice the onion and chillies and get them in the pan to soften. You don’t have to do this step but it takes the crunch off of the veg.

Moist light little bites.
For the batter:
In a bowl sift together the cornmeal, flour, baking soda, baking powder, garlic powder, and salt.
In another bowl, whisk three egg whites gently to get some air in them about 1-2 mins.
Add the creamed corn, tinned sweetcorn, and yogurt.
Gently whip up and add the dry ingredients a little at a time.
Add a little more than half the cheese and mix up, saving some for the top.
When all combined add the onions and peppers.

To bake:
Spray a square or rectangle pan with spray oil.
Pour the batter in and spread evenly throughout.
Sprinkle on the remaining cheese.
Place in a hot oven for about 45mins to 1hr. Check with a toothpick for doneness.

Thursday, 21 November 2013

Green Jerk Marinade

Jerk seasoning is becoming one of my new favorite experiments. I absolutely love layering spices and herbs and creating depth of flavour. This was such a simple recipe that didn’t take long to put together. I marinated my chicken for a few hours but I suspect you could get away with not marinating it at all because the spices are so pungent. I used bone in chicken breasts which are always a favourite. You could easily use duck or even pork, I think this would go lovely with pork tenderloin or some other light meat. This marinade will do for about 4 chicken breasts. Enjoy!

Ingredients:
1 tsp. black peppercorns
1 tsp. ground nutmeg
2-3inch small stick cinnamon
1 ½ tsp. ground ginger
3-4 tbsp. chopped coriander
Zest of one lime
Juice of one lime (two limes if it’s not juicy)
3 tbsp. olive oil
1 scotch bonnet pepper
5 cloves garlic
1 tsp. salt

To Make:
In a small blender, carefully add all ingredients and blitz up until it’s smooth.
Scrape every little bit out and pour over some meat (if it's too thick add a little water to smooth it out)!
I cooked my chicken breasts for about 35-40 minutes at 200C

Friday, 15 November 2013

Creamy Vegan Green Bean Casserole

Green bean casserole is such an American classic, typically associated with Thanksgiving dinner. I think it’s such a great dish and could be made with any special dinner. I really enjoy making it, but I was tired of the canned cream of mushroom soup that makes the sauce. I sought out recipes, and was open to the idea of something dairy free that didn’t require a load of cream or butter. I stumbled on a few recipes and here is my rendition of what I found! This is mostly adapted from a vegan recipe that got great reviews. Once I tried it I was hooked. This is quite possibly the most delicious green bean casserole I’ve ever made! The pictures show a half version that I did but the recipe is for the full version. I will be making it in the future. This recipe serves about 8. Enjoy.

Ingredients for the Green Beans:
500g-1kg fresh green beans rinsed and chopped (you can use tinned/frozen)
1 whole onion
3 cloves garlic
1 tsp. pepper
Salt to taste

For the Casserole:
1 diced onion
1 diced green bell pepper
2-3 cloves garlic
200g chestnut mushrooms (any mushroom, just not shitake)
1 tsp. fresh thyme
1 glass white wine
Pinch paprika
Olive oil
Fried onions for garnish (the French’s American ones)

For the Sauce:
1 c. unsalted cashews soaked in water for 1hr
1 tsp. corn starch
1c. +1c to thin the sauce vegetable stock (I use marigold vegan bouillon powder)

To start:
Get your cashews soaking immediately.
Make your stock.
Clean up your green beans and get them on to boil.
Boil them for about 30-45 minutes or until very soft.
Drain and set aside.

For the Casserole:
Dice your pepper, onion, garlic and slice the mushrooms.
Make the sauce; in a blender (a small fast one works well for this), blend the soaked cashews, corn starch, and stock for at least 3 minutes until thick and creamy. Set aside.
In a big sauté pan, heat a couple table spoons of oil, and begin to sweat off the onions, and peppers. When the onions are soft, add the mushrooms and the garlic.
Salt the mushrooms, and as they begin to soften add the white wine.
Cook off at a boil for a few minutes.
When the wine is cooked off, turn down the heat and add the sauce and sauté for a few minutes.
Next add the drained green beans, paprika and thyme.
Stir to combine, add more stock as it thickens and let cook for about 2-5 minutes until thick.
Put in a casserole dish and sprinkle with French’s fried onions and bake at 175C or 350F for about 30 minutes.

Tuesday, 12 November 2013

Plum Upside Down Cake

I had a punnet of plums and I was trying to make something like a tart tatin, and then it just sort of ended up more like an upside down cake. I absolutely surprised myself on this one; I must be getting better at desserts because we ate it up! I put some crème fraiche sweetened with a little sugar just on top. I'm generally not a dessert person but I am trying to expand my recipe list so that I have things available on hand to me in a pinch. This is so unbelievably simple and I encourage anyone to try it. Yo could even try it with fresh peaches, or strawberries or raspberries. Impress your family with this one. Serves 8. Enjoy!

Ingredients:
300g plums ripe, cored sliced 1cm
butter for greasing pan
2 tbsp sugar for pan
100g butter – soft/room temperature
100g flour
100g caster sugar
50g ground almonds
3 eggs
1 tsp. baking powder
½ tsp. baking soda

To Start:
Generously grease a pie tin with butter and sprinkle with 2 tbsp. of sugar.
Core and slice the plums and arrange on the pie tin in a circular pattern or the pattern of your choice.

For the Cake:
In a bowl combine the soft butter, eggs and sugar, cream together until smooth.
Next sift in the flour, backing powder and baking soda.
It will be a thick batter, so pour over the plums and spread out evenly.
Bake at 200C or 400F for about 30-40 minutes, check at 30 minutes and see if a tooth pick comes out clean.
When done take out of the oven and cool for 5 minutes.
Place a plate over the pie tin and flip it carefuly.
Serve with crème fraiche or cream and enjoy!

Thursday, 7 November 2013

Classic Toad in the Hole

Toad in the hole, what can I say? I had no real idea what it was when it came to British classics. I thought it was something like ‘pigs in a blanket’, which to me is a lovely little Polish sausage wrapped in a crescent roll. What British people think pigs in a blanket is, is a little cocktail sausage wrapped in bacon. While equally nice neither of these things are what I expected. When I looked into toad in the hole to make it on bonfire night it looked really good and interesting. More like a main course than an appetiser! It’s a lovely Yorkshire pudding batter poured over hot oil and sausages and baked. The texture is really great, it has a nice crunchy outside and a very lovely eggy soft middle by the sausage. I encourage anyone to try it, it’s so simple and makes an excellent economical meal! This serves just 2 only because I used 4 sausages, but you could easily use more sausages for this batter recipe. I adapted this recipe from several ones I read online so but my husband who is British gave it the stamp of approval! Enjoy!

Ingredients:
100g plain flour
1 scant tsp. English mustard powder
½ tsp. salt
2 eggs
250ml milk
1 tsp. fresh thyme leaves
4 lean pork sausages (you can use up to 8 sausages)
1 ½ tbsp. oil (anything except olive)

To start:
Heat oven to about 220C or 400-420F (really hot!)
Get the batter going by mixing the flour, salt and mustard powder. Mix around until combined.
Add in the eggs and half of the milk. Mix slowly until combined.
Pour in the rest of the milk and the thyme until all is incorporated. Set aside.

For the Sausages:
In a reasonably sized roasting tin, pour the oil in and lay the sausages out.
When the oven is hot, place them in for about 15-20 minutes, depending on how thick your sausages are. The goal is to half cook them before the batter.

To Finish:
When the sausages have cooked about 15 minutes, take the pan out and carefully pour over the liquid batter. Be very careful as the batter will splatter in the hot oil.
Cook for 30-40 minutes in the oven, and gauge doneness by the golden crispy crust.
Take out the glorious bake, and serve with some fresh onion gravy and steamed seasonal veggies. YUM!

Thursday, 31 October 2013

Butter Bean Bacon and Autumnal Squash Stew

I love dried beans, and with the weather really getting more troublesome with cold temperatures and even colder rain, I like to stock up and just have them around for really comforting dinner. I’ve also been trying my hand at bread making so this is an excellent accompaniment. I never knew that butter beans were lima beans. I used to think I hated lima beans as a child. I think it must be because when I was a child they came in a can and were green. Who knows, but my recipe for the lima beans now is amazing and I love it. Either I know how to cook them now or I was just a silly child. Probably both. I generally don’t soak my beans as I like the idea of having a pot cooking all day, but if you’re pressed for time and have the time to soak them in advance, I would soak them over night. This serves about 5 depending on your hunger levels. Enjoy!

Ingredients:
500g hard squash (butternut, pumpkin, red kobacha etc..)
400g dry butter beans
100g streaky bacon (about 6-8 rashers)
1 large onion
1 stick celery
1 green pepper
4 cloves garlic
2-3 litres of water
2 tbsp. bouillon powder (stock cubes work too)
1 tsp. pepper
Salt to taste

To Start:
Peel and dice your squash. Be careful with this; use a sharp knife and a sturdy cutting surface.
Dice your onion, celery, bacon and green pepper and garlic. (The garlic can be smashed and stay whole as it will be cooked for a long time it will just disintegrate).

To Cook:
Heat a large pan on high, and add the bacon. Stir it around and encourage it to get crispy. 5-6 minutes.
Next add in the onions, peppers, celery, and garlic. Stir around for a few minutes (you may need to add oil depending on how fatty your bacon is)
Add the beans, water, pepper (no salt yet) and bouillon cubes and bring up to a boil.
Once at a rolling hard boil, turn down to a low-med heat (small boil).
Cook for about 2-3 hours, or until beans are completely soft and cooked through.
Salt to taste and serve hot with fresh bread.

Tuesday, 29 October 2013

Cajun Style Dirty Rice

Sometimes things can never make you feel as happy as things from back home. Now, while I'm not quite Cajun, I am close enough in Texas. I used to make this dish (maybe not so traditionally) all the time for my roomates and friends who would come over. I have never made it with the chicken livers before but I thoroughly enjoyed it! It gives it a really lovely depth of flavor. I'm a sucker for offal so this was just up my alley. It's really simple to prepare, and you can use any leftover rice that you have. This recipe serves 2-4 depending on how hungry you are! Enjoy!

Ingredients:
250g lean pork mince
200g chicken livers
3c. cooked rice
1 stick celery
1 green bell pepper
1 onion
3 cloves garlic
1 tbsp. Cajun seasoning (If you don't have this add equal parts, cayenne, thyme, oregano, salt and pepper)
1 tbsp. oil
1c vegetable stock (maybe less, eye it)
Fresh parsley

To Start:
If you haven't boiled your rice, boil your rice according to the instructions.
Dice finely, peppers, onion, celery and garlic.
Dice the chicken livers to a mince and set aside.
Heat the oil in a hot pan and add the pork mince to brown.
Next add in the onions, celery, pepper and garlic.
Fry down for a few minutes until the peppers and onions have softened.
Add the chicken livers and stir around until thoroughly cooked. About 5 minutes.

To Finish:
Add the hot rice and mix thoroughly, along with the Cajun spice, and about a quarter of the stock)
Simmer on the stove for a few minutes.
Mix around and add more stock to combine ingredients.
When everything is warmed through, taste for seasoning then add the parsley.

Friday, 25 October 2013

Cod in Tomato Thyme Sauce

This is the simplest recipe to make when you're in a hurry. It's also really healthy for you if you're watching your calories! I know a few people who don't like fish that have really enjoyed this. This rich tomato sauce is a lovely compliment to the white flaky fish. You can add any herbs you want but I think fresh thyme goes the best here. Don't skimp on the garlic either! Serves 2-3. Enjoy!

Ingredients:
400g white fish such as cod, haddock etc..
1 400g tin chopped tomatoes
½ small onion
3 cloves garlic
1 tsp. dark brown sugar
½ tbsp. olive oil
Few sprigs fresh thyme (1 tsp. dry thyme will work as well)
Salt and pepper to taste

To Start:
Dice your onions, chop your garlic and get a pan hot.
Heat the oil and saute the onions for a few moments.
Next add the garlic, and tomatoes, and thyme.
Bring to a bowl then down to a simmer for about 15-20 minutes. (trust me simmering does the world of good)

To Finish:
Add the brown sugar
Place the fish pieces in the sauce.
Spoon over some of the sauce onto the fish pieces.
Cover and continue to simmer for a further 10 minutes or until fish is cooked through.
Serve over toasty brown rice.