Tuesday 28 October 2014

Party food: Pecan Crusted Cheese Balls

So if you're like me, at this time of the year you're trying to get ready for all the unexpected events over the next few months. Perhaps you're having a party, or a get together to celebrate the season and want to get ahead of the game and have things prepped for just an occasion. These cheeseballs are so easy to make, and they really are a crowd pleaser. I make mine months in advance and wrap them in cling film and foil and they last up to a year in the freezer! There is tons of variations you could do with this, I was even going to try a goats cheese next year in addition to soft cream cheese. This recipe was inspired by my friend Nichole who really loves the holidays and gave me her own recipe; where she got it I don't know. I tapered it to my own likings and my own ingredients and what I had available to me. I have made these two years in a row and they really are perfect for entertaining. Just take them out of the freezer at least 12hrs ahead of time, you can leave them on the counter and it should be fine. Enjoy!
pecan crusted cheese balls for holidays
Serve with apples, celery and crackers!

Ingredients:
200g room temp. light cream cheese
100g room temp. light cream cheese with chives
2 tbsp. finely chopped fresh chives
150g grated mature cheddar (I use Davidstow lighter)
1 tsp. paprika
½ tsp. smoked paprika
¼ tsp. garlic powder
pinch pepper
pinch cayenne powder
100g chopped pecans

Method:
In a bowl mix together all of the ingredients really well. This will take some time to ensure that the spices are blended properly so take your time.
Place in the freezer for 20-30 minutes to harden.
While the mixture is hardening, chop the pecans finely and lay on a large flat surface like a plate.
Take the bowl out and (I used my clean hands) form two large balls.
Take each ball and roll in pecans and set on cling film.
Wrap carefully in cling film, then in foil and freeze immediately.
This recipe makes 2 large balls suitable for 10ppl.

Thursday 23 October 2014

Easy Peanut Butter Banoffee Pie

To be clear, I had no idea what a banoffee pie was until I moved to the UK, and I didn’t realize how easy it was to make until I made this one. I have wondered since then why I haven’t made one more often? The traditional way to make it is a biscuit crumb base (like a cheesecake base), then a layer of caramel, bananas, cream and some chocolate on top. I just like the idea of peanut butter and banana so I thought for my first attempt at this banoffee pie I would just go all out and experiment. To be honest I’m not sure if I can bring myself to make it the original way because the added peanut butter was amazing! If you’ve made banoffee pie and like it, this is for you, if you haven’t this is for you, if you want to then this is for you….get it? This recipe is for you! Eat eat eat…but I warn you, try to pawn some of it off before you eat it all yourself. This makes…a serving for one or a few more, depending on how much you want to share!

Peanut butter banoffee
Okay, so it's not the prettiest photo; but it's the best!!

Ingredients:
200g digestive biscuits (or you can use an American pre-made graham cracker crust)
50g melted butter (for the biscuits)
400g tin caramel or make your own
2 tbsp. smooth peanut butter
500ml double cream
2 fresh bananas slightly green still
Dark chocolate for shaving on top

Method:
If you haven’t got a pre-made crust, wiz up the biscuits in a food processor or bash them up into pieces and combine with the melted butter.
Press the crumbs into a pie tin and put in a fridge for 30miniutes.
In a bowl mix the caramel and the peanut butter until smooth.
Take the pie out of the fridge and spread the caramel and peanut butter over the bottom as evenly as possible, you can obviously use as much or a little as you want.
Next slice all of the bananas and lay them on top of the caramel.
Return to the fridge for at least 30 minutes, or until you want to serve it.
When you’re ready to serve it, whip up the double cream until stiff and spread over the top of the bananas.
Grate chocolate on top, slice and serve!

What could be more easy?

Monday 20 October 2014

Oven Cornflake Fried Chicken and Leek Macaroni and Cheese

I decided that I am going to make one big post so bear with me. This was a weekender meal so it’s not that calorie conscious but I’m completely on the 80/20 perspective where I’m healthy 80% of the time and 20% of the time I’m letting lose and eating some extra calories. I have no idea of the nutritional value down to the calorie but I do know the macaroni and cheese is somewhere in the vicinity of 250 calories a portion.

I had previously made oven fried chicken a long time ago, and I apologize there isn’t a better picture of it. As most bloggers know it’s a curse to blog something you’re eating for dinner because by the time it’s ready you’re starving and you just snap a shot of it and it may or may not be good! But you’ll have to use your imagination. I am a bit annoyed I didn’t get a better photo because I am doing this as a recipe revamp, but to be honest, with the old recipe, no picture might have been better than the actual photo used! This is definitely not fried chicken, but it’s a nice alternative if you’re hankering for something lighter and oven made. This recipe is just for two but can easily be doubled for more. Enjoy!

Oven fried cornflake chicken and leek macaroni and cheese
The chicken is hiding in the back!

Ingredients:
2 bone in chicken breasts
600ml buttermilk
1 tsp. tabasco sauce
1 tsp. Worcestershire sauce
1 egg
6-8 cups crushed corn flakes
1 c. seasoned flour

Mac and Cheese:
125g macaroni pasta
1 large leek
1 clove garlic
300ml milk
50g butter
50g flour
50g low fat cheddar cheese
20g parmesan cheese
50g light Philadelphia cream cheese

To Start:
Pour all of the buttermilk in a bowl and put the chicken in to marinade for at least 5 hours.
When you’re ready to cook your chicken, drain all of the buttermilk from the chicken, wiping off as much as you can but reserve about 150-200ml.
Add to that reserved buttermilk the Worcestershire sauce, tabasco and egg.
Mix thoroughly.
Make sure you have a dish out for dredging the chicken in seasoned flour and a dish with the crushed cornflakes.

To make the Chicken:
Dip the chicken in the flour, coating completely, try to cover all wet areas with flour.
Next dip the breasts into the buttermilk/egg mixture and then into the cornflakes.
Once properly dredged set aside on a foil lined baking tray and bake in a 200C oven for about 45 minutes.

For the Mac’n’Cheese:
Cook the macaroni according to directions and set aside.
Melt the butter in a non-stick pan.
Slice the leeks up finely, and mince the garlic and sauté in the butter until well soft.
While the leeks are cooking, shred all your cheeses and measure out everything.
When the leeks are soft, sprinkle in the flour and stir to combine and cook out the flour; about 3-5 minutes on low heat.
Next add the milk stirring frequently while it thickens.
When it’s thick add in the cheeses, leaving a little parmesan behind for the top.
Taste for seasoning, and mix in the cooked macaroni noodles.
Top with the remaining cheese and add some cornflakes on top if desired.
Bake in a hot oven for 30 minutes or until brown on top.

Thursday 16 October 2014

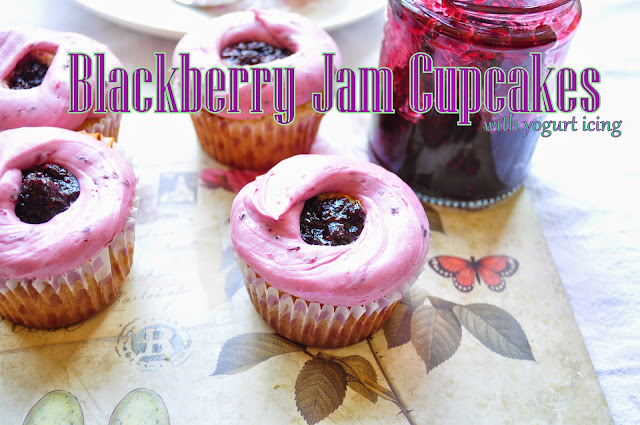
Blackberry and Chambord Cupcakes

So all of the last blackberries have been picked and foraged and many of us have put some in jam jars to keep in the coming months. I know I did! I had a random jar lurking around in the fridge and I thought I’d use it up. I’m such a sucker for cupcakes these days, I think it’s because you can pick one up without feeling as guilty as cutting a slice of a huge cake! However this logic works, it proves to be highly illogical because it’s quite easy to get more than one! Never mind. Anyways, I decided to just try some cupcakes, and I made the icing out of a little yogurt milk and icing sugar, and of course some blackberry jam. Really easy to make and you could use any type of jam you like. Makes 6 cupcakes, enjoy!
blackberry and chambord cupcakes
Lovely and moist, perfect with a cuppa!

Ingredients:
80g butter
80g self-rising flour
80g caster sugar
¼ tsp. baking powder
½ tsp. vanilla
Pinch salt
2 eggs
1 tbsp. Chambord (or milk)
¼ c. blackberry jam + 1 tbsp.
50g greek yogurt
Milk
Icing sugar

To Start:
Cream the butter and sugar together until smooth.
Next mix in the vanilla and eggs.
Slowly sift in the flour, salt and baking powder.
Stir well to combine.
Put into muffin tins and bake for about 10-15minutes.

For the Icing:
*The reason I haven’t given exact measurements is because for me this isn’t a science, it’s very little by little adding some and eying it. So with that said….
Add a tablespoon of greek yogurt a tablespoon of milk and keep adding icing sugar and yogurt until it’s the consistency you like.
Add about 1 tsp-1 tbsp. jam to get the colour and consistency you like.
Keep adding sugar until it’s firm enough to ice.

To Finish:
When the cupcakes are out of the oven and cool, take a small teaspoon and dig out a tiny portion of the middle, you don’t have to take much just a little to get a nice blackberry filling.
Dollop a good half tablespoon to tablespoon into the hole keeping it in the middle.
Put the icing in a bag and pipe two large circular layers around the jam and then they’re ready to serve!