Showing posts with label lunch. Show all posts

Friday, 27 February 2015

Easy Bacon Jam

Bacon jam. It doesn't really need much explaining. It's sweet and savoury and all things you could expect from two really wonderful things that you can put on bread. I found this especially delicious as an addition to cheese on toast, and just toast.

Before I made the recipe fit my own standards I did a lot of looking at a lot of different recipes. I used what I had and what flavour profile I wanted to get out of it. I just happened to have a bottle of wild blueberry maple syrup so I decided to use that. I really think that anyone could get by without this and just use regular maple syrup and be just fine. I also decided at first that this would be a slow cooker recipe, but it just didn't transpire in translation when I actually went to make it. I made the first few parts or so in a pan, and then transferred. I was very impatient and did not want to leave this to boil away for 8 hrs!! Even though I gave it a go, but it was too slow!! So I just took it out, transferred it to a small pan and boiled the crap out of it until it was a sticky slimey yummy ooey gooey jam! The ingredients for this makes a small jar full, or about 10 servings (I use about a tablespoon per slice of toast). You could easily double it, and it would be a fantastic artisan gift! Enjoy!
bacon jam
Particularly good with cheese! :)

Ingredients:
400g smoked streaky bacon 1cm pices
¼ c. dark muscovado sugar (regular brown sugar is fine)
½ c. Jack Daniels Honey (regular Jack Daniels is fine too)
¼ c. blueberry maple syrup
½ c. espresso or coffee
200g onions diced
¼ c. apple cider vinegar
4 cloves garlic

Method:
Cut up all the bacon into small strips of 1cm.
Dice the onion and garlic.
Get a pan roaring hot.
Start to render the fat on the bacon by placing them in the hot pan and stirring constantly.
When your bacon is crispy and golden drain off all the fat either by spooning it out or using a lot of paper towels. Make sure you've got most of the fat out.


Next add in the onions and garlic and stir fry for about 5-10 minutes on medium heat.
Next add the muscovado sugar and stir through until you have coated the onions and it's starting to look sticky.
Crank up the heat and add in the Jack Daniel's until reduced by half, then add in the maple syrup, coffee and vinegar.ink
Bring up to a rolling boil and then turn down and simmer stirring frequently for about 1hr or unti all of the liquid is gone and you just are left with jam.

*****Note: did not use a slow cooker a
fter all, even though it shows one in the photo


Monday, 15 September 2014

Light Mexican Chorizo

When I moved to England, I couldn’t believe how many things I would miss from home! One of the most missed things is waking up early and getting potato, egg, and chorizo tacos on the way to school twice a week. Sadly there’s no Mexican chorizo to be had in the UK. What they have here is Spanish chorizo which is much different. There are similar flavours in that you’re tasting garlic and paprika, but more smoky paprika in Spanish chorizo. The thing I absolutely don’t miss about Mexican chorizo is the grease! Oh it tastes soo good but it’s not good for you!! There is something comforting in a bit of grease running down your arm while you grasp that taco first thing in the morning. However comforting that is, or might be it’s not for today’s recipe! This is super easy to make, and I haven’t taken any photos of things I’ve made with it but I just portion this recipe into four parts and it feeds two each time. I put it in the freezer and take it out for breakfast tacos, or mix with rice or potatoes for a side or main dish. Enjoy!

Light Mexican Chorizo
The possibilities are endless.

Ingredient List:
500g lean pork mince
3 cloves garlic
2 tbsp. ancho chilli powder
2 tbsp. sweet paprika
1 tbsp. smoked paprika
½ tsp. dried Mexican oregano
¼ tsp. pepper
2 tsp. chilli powder
1 ½ tsp. salt
¼ tsp. cayenne
¼ c. apple cider vinegar
Small pinch cinnamon
Small pinch cloves

Friday, 15 August 2014

Middle Eastern Style Veggie Burgers with Pickled Red Onions

This is a recipe revamp from my old collection. I previously called them baba ghanoush veggie patties but I realized when I was retesting the patties that they’re much broader than that because they’ve got goats cheese in them. Regardless of that they still came out just as delicious as before. I also wanted to add some zing to them, and made some pickled onions to go with the patties. These are amazing and can go with anything. They’re much like the pickles you’d find in Texas on carnitas tacos. I also used them to serve alongside some pulled pork. They’re pretty versatile and really nice to snack on. The recipe for the burgers makes about 6.
Middle Eastern Style Veggie Burgers
Delicious in a burger or on it's own.

Ingredients:
1 400g tin cannellini beans – drained and dried
1 medium aubergine
1 medium red pepper
125g goat cheese
50-75 bread crumbs (Or 2-3 slices of white bread whizzed up in the food processor)
1 egg
½ tsp. garlic powder
½ tsp. cumin
¼. tsp. paprika
¼ tsp. turmeric
Salt to taste
Handful of cilantro
Oil to fry

To start:
Slice the eggplant and red pepper in half, roast in the oven with a little oil until soft and mushy.
Drain the beans and rinse. Drain thoroughly.
In a food processor whiz the beans, goats cheese, roasted aubergine, red pepper and spices and half of the bread crumbs.
When combined add the egg and whiz again.
Depending on how wet this batter is adding some more breadcrumbs as needed. The consistency you’re looking for is of thick pancake batter.

To cook:
Heat a couple of tablespoons in a pan until very hot.
You’ll want to spoon the batter in the hot oil.
Make the patties the size you desire and cook for 3-5 minutes on each side.
These will be very delicate so take care when flipping.

For the pickled onions: (Note: Adapted recipe from here.)
100g thinly sliced red onions
1 medium cinnamon stick
½ tsp. red pepper flakes
Juice of one lime – if it’s not juicy enough use two.
1 c. apple cider vinegar
75g caster sugar
1 tablespoon salt

Method:
In a small saucepan bring all of the ingredients slowly up to a bowl so that the spices have time to steep and the sugar has time to dissolve.
Blanch the onions for 10 seconds with freshly boiled water and drain immediately.
Shove the onions into a jar.
When the sugar is dissolved in the brine pour carefully over the onions and let sit until room temperature.
When cool cover and refrigerate for up to a week.
After 10 minutes in brine it's ready!

Friday, 8 August 2014

Curried Piccalilli Scotch Eggs with Curry Ketchup

Who doesn’t love a scotch egg? I know I do! I have made a few attempts at making them but it always turned into a disaster. I watched a few videos on how to do the breading and I think I have it down! I wanted to incorporate the traditional dip ‘piccalilli’, that goes with scotch eggs, into the actual sausage meat. If you’re willing to take a little time to make these they make great picnic accompaniments. They’re rather large so you can assume it will fill you up! I could easily split one with someone else on a picnic. This recipe makes 4, and unfortunately it’s hard to make them any smaller because the eggs are quite large to begin with. It was a bit of a messy job making these so it was harder to photo the entire process, so I only have the end result. Enjoy!
Curried Piccalilli Scotch Eggs
Delicious oozy runny yolks :)

Ingredients:
500g lean pork mince
200g piccalilli (chopped up very finely)
8 large eggs (4 for breading 4 for boiling)
2 tbsp. curry powder (reserve 1 tsp. for the curry ketchup)
4 large eggs
200g bread crumbs (or about 5 cups)
150g seasoned flour
Oil for frying
Cling film
½ c. ketchup to serve

To Start:
Get on a pot of water to boil.
When the water is boiling gently put the eggs in and boil for six minutes exactly. Take out and run under cold water; peel and set aside.

To Prep:
Pull out 4 large pieces of cling film; set aside.
Make breading stations, 3 bowls with b
Next chop the piccalilli as fine as you can and mix it with the pork mince.
Divide in four equal portions.
Place one portion on a piece of cling film and press out into a circle.
Place the egg in the middle and bring the cling film together, twisting tight and bring the meat to the egg covered completely.
Repeat for all eggs, and refrigerate for 1hr.

To Bread: (THE MESSY PART)
Take the chilled sausage and eggs out of the fridge, dip in the flour first, then into the egg, then into the bread crumbs.
From the bread crumbs, toss back into the egg to coat, and then back into the breadcrumbs.
Set aside while you do the others, and refrigerate for another 30 minutes.

To Cook:
Heat your oil to about 180C – I did not have a temperature gadget so I just eyed it.
They should take about 6-8 minutes until golden brown.
When done remove and let sit on a paper towel for 20 minutes before digging in as they are hot!

For the curry ketchup:
In a small saucepan, heat up the ketchup and 1 tsp. of curry powder just until heated through.
Let cool and use for dipping the egg!

Wednesday, 21 May 2014

Vietnamese Meatball Buns with a Spicy Tomato Sauce

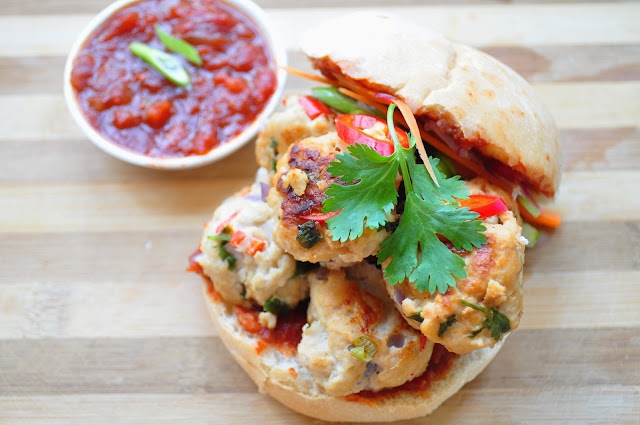
I’ve been experimenting with meatballs lately. I had some ground turkey and I wanted to make some Vietnamese flavoured ones; ideally they would have gone better with pork, but I only had turkey! They turned out fantastic! I really loved them. They’re basically my take on a bánh mì sandwich. Of course I also didn’t have any baguette either, but I had buns and it worked!! The flavours were all there. I even pickled some carrots and cucumber to give it an extra crunch, since the meatballs are soft. Top with fresh chillies and coriander you’ve got yourself a massive punch of flavour! As an added bonus I’m including the recipe for the spicy tomato sauce I made to go on the bread, if you’re feeling up to it turns into a delicious thick ketchup type of sauce, thick and glorious, wonderful on many things! This recipe can serve 2-3 depending on how many meatballs you make. I got 18 small meatballs out of this, and can fit about six in a sandwich. Enjoy!
Vietnamese Meatball Buns
My take on a bánh mì!

Ingredients:
250g turkey breast mince
1 small red onion
1 chilli (or half depending on how hot they are)
1 tbsp. freshly grated ginger
2 garlic cloves also grated to a puree
1 spring onion
Small handful fresh coriander
Dash sesame oil
1-2 tbsp. soy sauce
50g bread crumbs soaked in a little milk
1 egg white

To start: (If you’re making the sauce, I would recommend starting that first; see bottom)
Dice finely, small red onion, chilli, coriander and spring onion.
Grate the ginger and garlic into a paste.
In a bowl, mix together minced turkey, soy sauce, sesame oil, bread crumbs, egg white and diced vegetables including ginger and garlic.
Mix thoroughly; hands are best here!

To Cook:
I used a non-stick skillet so I’m able to not use oil, if you’re using oil, only use a tablespoon or two to get it done.
Get the pan on high heat, while it’s heating make your meatballs.
It helps me if you get your hands wet before you dive into the mixture to make the balls.
Form into small 1-2 inch balls and set aside.
When the pan is hot, set them down and fry to get a good colour on them.
Try not to turn them before they’ve got the proper brown color because they’ll just stick and pull apart.
I like to put a bit of water in the pan and cover with a tight lid for a few minutes until they’re done.
Since they are small they will cook really fast.
When they’re done pop some sauce on a bun and get them in your tummy!

Note:
If you would like to pickle some vegetables to go with the sandwich all you need is the 1:1 ratio sugar to white vinegar. I use slightly less sugar because I prefer the punch of the vinegar.
Heat up the sugar vinegar mixture until the sugar is dissolved.
Slice some vegetables like carrot, cucumber, chillies and red onion finely and place in the solution and sit for about 20-30 minutes. Enjoy!


Spicy Asian Tomato Sauce

To be honest, I know that tomato isn’t a base for many sauces in Asian cuisine but I wanted to make a thick bbq like sauce. This is dead simple, all you have to do is dump all of these ingredients into a pan, bring up to a boil and simmer for about an hour until it’s thick and syrupy.

Ingredients:
1 400g tin of chopped tomatoes
1 tbsp. hoisin sauce
2 tbsp. soy sauce
1 tbsp. fish sauce
3 tbsp. honey
1 onion diced
3 cloves garlic diced or grated
1 knob ginger grated to a paste
1 tbsp. Chinese five spice
½ tsp. red chilli flakes (I used the hot Korean kind)

Friday, 25 April 2014

Caramelized Red Onion and Mature Cheddar Portobello Mushroom Quiches

I was thinking the other day that I don’t particularly love mushrooms, even though I generally use them quite a lot. I tend to try to think of other ways to use ingredients I don’t particularly like. I got a tip from a few websites and read no further, I decided to just try on my own. I’m not particularly brilliant with quiche either. But I decided to give it a go. They came out absolutely amazing! So yummy, and for me a great way to use a Portobello! If you give this a try I guarantee you that you can come up with something fantastic and imaginative with the ingredients. I decided to go for a simple vegetarian cheddar and onion, but the possibilities are endless! I can even vouch that these are extremely healthy and low fat and low carb. I don’t generally cut out carbs but when it’s this good why not? This is for 2 people and could be easily easily doubled, and perfect for lunch, or a impressive brunch!
Mushroom Quiches

Ingredients:
3-4 large portobello mushrooms
2 eggs
½ c. milk
1 red onion
50g frozen spinach thawed (optional)
30g grated mature cheddar
Salt and pepper to taste
1 tsp. sunflower oil

For the Accompanying Salad:
2 salad tomatoes
½ cucumber
Handful mint and coriander
Red wine vinegar

To start:
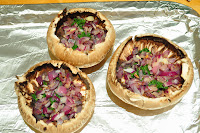
mushroom gills removedPreheat oven to 180C
Heat a pan with the oil.
Dice your red onion finely and add it to the oil stirring frequently and remove from heat when caramelized.
Begin to clean out the mushrooms, remove stem and use a spoon to scrape out the gills, until you have nice little ‘bowls’.
mushroom gills removed layered with spinach and red onion
To Finish:
Mix the eggs and milk with salt and pepper until frothy.
Place spinach, the caramelized onion and a bit of cheese on the bottom of each mushroom.
Top with the egg mixture. (This can be tricky as some mushrooms are split and might have spillage, take care to lean them up against something so it doesn’t leak out).
Place in a hot oven for about 30-45 minutes depending on your oven.

For the Salad:
Slice the onion very thinly and soak in a few dashes of red wine vinegar.
In a separate bowl combined cubed cucumber and tomatoes, and salt liberally.
Chop the herbs, and then combine all of the ingredients and it is ready to eat.

This recipe was brought to you by the onion challenge at The Spicy Pear , and Citrus Spice UK

Thursday, 3 April 2014

Skillet Salsa Eggs

I was going to call this Mexican eggs, but it ended up being almost exactly like huevos Rancheros, but not enough to be called huevos rancheros. So salsa eggs it is! This is more or less something I remember from my childhood. I don’t know where this dish comes from in my mind, but it’s a simple pleasure that strikes a very familiar chord with me. I don’t remember eating a lot of bacon growing up, except at some certain friends’ houses. My mom did always fry up some fresh tomatoes with chillies and put it along with eggs, and perhaps this is where it came from. Either way, in all practicality, it’s a hell of a way to have a hearty Sunday breakfast to cure any heavy night out previous. With its simple ingredients, all you need is a tortilla to sop up the goodness. Enjoy! This recipe is for two people, the tomato sauce can handle a couple more pieces of bacon and two more eggs before you crowd the pan too much!
Salsa eggs and bacon in one skillet!
Salsa, eggs, and bacon all in one pan!

Ingredients:
4 unsmoked bacon rashers ( you can use smoked )
4 eggs
1 tin of chopped tomatoes
½ green pepper
1 chilli
1 small onion
1-2 cloves garlic
2 pinches cumin
Coriander and cheese for garnish
Half can of water
Large sauté pan with a lid (non-stick preferably)
Oil if you’re not using non-stick

To Start:
Get a large sauté pan hot.
Dice the green pepper, onion, chilli and garlic.
Add the bacon to the pan and crispen up, about 1 minute.
Next add the green pepper onion chilli and garlic, stir frequently.
When the vegetables become fragrant add the tinned tomatoes and half a can of water.
Bring to a rapid boil and simmer for about 5 minutes.

To Finish:
When the veggies are soft, season with salt and pepper and cumin.
Make a little hole for the eggs by pushing aside the sauce.
Drop four eggs in the pan and turn the heat down to low and cover.
The eggs should be wobbly at the top and white.
All you need to do is top it with some queso fresco, or feta for those who can’t get it, and some coriander (cilantro).
Enjoy!

Monday, 24 March 2014

Smoked Salmon Deviled Eggs

Deviled eggs are a classic party food, and these I decided to make with a very simple twist. For those of you who don’t frequently eat deviled eggs they’re a tiny bit of joy into the mouth. Hard boiled eggs, with the yolk taken out and mixed with mayonnaise or any other types of ingredients and fill them back in the half white shells. They’re perfect for any occasion, such as picnics, BBQs, holidays and gatherings. They’re so versatile too; you can use this recipe to jump into something more adventurous. The sky is the limit really because so many things go with eggs. My recipe here is for 12, but you can easily do more as I’ve found at so many gatherings I’m often left with none! Spring is coming up and it’s a perfect time to give it a go!
Smoked Salmon Deviled Eggs
Perfect treat to impress guests!

Ingredients:
6 hard-boiled eggs
5 tbsp. extra light mayo (I use Hellmann’s)
100g smoked salmon
1 tsp. Dijon mustard
Salt and pepper to taste
Garlic powder
Paprika for dusting

To Start:
Peel the eggs, slice carefully in half and remove the yolk and place into small bowl.
Arrange the egg white halves nicely on a platter.
Dice the salmon into very small pieces

To Make:
Mix the yolks thoroughly with a fork to break up any lumps.
Add the mayo and the Dijon and mix thoroughly. (A hand blender works fantastic here).
Salt and pepper to taste with a dash of garlic powder.
Fold in the smoked salmon and mix to incorporate.
In a piping bag carefully add the mixture and pipe into the egg whites.
Alternatively you can spoon it in as well.
Refrigerate covered in cling film, eat on the same day.

Thursday, 31 October 2013

Butter Bean Bacon and Autumnal Squash Stew

I love dried beans, and with the weather really getting more troublesome with cold temperatures and even colder rain, I like to stock up and just have them around for really comforting dinner. I’ve also been trying my hand at bread making so this is an excellent accompaniment. I never knew that butter beans were lima beans. I used to think I hated lima beans as a child. I think it must be because when I was a child they came in a can and were green. Who knows, but my recipe for the lima beans now is amazing and I love it. Either I know how to cook them now or I was just a silly child. Probably both. I generally don’t soak my beans as I like the idea of having a pot cooking all day, but if you’re pressed for time and have the time to soak them in advance, I would soak them over night. This serves about 5 depending on your hunger levels. Enjoy!

Ingredients:
500g hard squash (butternut, pumpkin, red kobacha etc..)
400g dry butter beans
100g streaky bacon (about 6-8 rashers)
1 large onion
1 stick celery
1 green pepper
4 cloves garlic
2-3 litres of water
2 tbsp. bouillon powder (stock cubes work too)
1 tsp. pepper
Salt to taste

To Start:
Peel and dice your squash. Be careful with this; use a sharp knife and a sturdy cutting surface.
Dice your onion, celery, bacon and green pepper and garlic. (The garlic can be smashed and stay whole as it will be cooked for a long time it will just disintegrate).

To Cook:
Heat a large pan on high, and add the bacon. Stir it around and encourage it to get crispy. 5-6 minutes.
Next add in the onions, peppers, celery, and garlic. Stir around for a few minutes (you may need to add oil depending on how fatty your bacon is)
Add the beans, water, pepper (no salt yet) and bouillon cubes and bring up to a boil.
Once at a rolling hard boil, turn down to a low-med heat (small boil).
Cook for about 2-3 hours, or until beans are completely soft and cooked through.
Salt to taste and serve hot with fresh bread.

Monday, 16 September 2013

Split Pea Soup with Smokey Bacon

When it’s cold and rainy outside, sometimes you just want to snuggle up with a big bowl of moreish soup, stew, or anything that makes you feel warm and cozy. For me, it’s always beany soups. My mom used to make split pea soup for me all the time growing up. It’s completely simple, and I was able to source ingredients that made it taste just like my moms, which uses a smoked ham hock. It’s difficult to find that here without going to a butcher and putting in a special request so I use smoked streaky bacon. This serves about 4-6 portions depending on how hungry you are! Serve with hot crusty fresh bread. Enjoy!

Ingredients:
500g green split peas
6 rashers streaky bacon
3-4 carrots
3 garlic cloves
1 whole onion
1 tsp. pepper
Soured cream or yogurt to finish

To start:
Slice the bacon into little strips.
Get a large pot hot, and throw the bacon in there to cook off and get brown and render some fat.
Throw in the peas and 1.5lr of water, or covering it by 4 inches.
Peel and chop the carrot (leave in quite thick chunks).
Dice the onion and garlic and toss in.

To Cook:
Bring that up to a boil and simmer for about 2-3hrs stirring every 30 minutes.
You will know when it’s done as the peas will turn to mush and everything will be one thick stodgy stew.
Serve hot with crusty bread and a dollop of sour cream.

Tuesday, 10 September 2013

Pork and Prawn Summer Rolls

These are my absolute favourite part of a Vietnamese meal. I always order these before I order my pho or bun thit nuong. I haven’t tried my hand at the fried spring rolls but maybe another time. This is really a no brainer; it’s not difficult at all. I literally can throw these together in a few minutes. The only prep is the vegetables that you want to go inside. I generally get all of the fillings set up and sliced beforehand so that you have everything you need when you’re ready to roll up. They’re such a great snack and actually pretty good for you. This makes 8 rolls. Enjoy!

Ingredients:
8 Sheets of rice paper
100g vermicelli rice noodles
100g cooked prawns
50g pork shoulder
4 spring onions sliced lengthwise
1 large carrot shredded
50g mint leaves
50g coriander leaves
100g shredded iceberg lettuce
Hoisin sauce and srirracha for dipping

To start:
Place all of your veg in little piles on a large plate or cutting board.
To cook the pork and prawns, bring a small pot of water to boil with a dash of salt.
Drop the pork in first and boil for about five minutes, then add the prawns boil until pink about 1 more minute.
Take out the pork and slice very thinly. Set aside.

To assemble:
In a large bowl pour 1 litre of half boiled water from the kettle in. (If you boil the kettle it will be too hot for you to get the rice paper out).
Get one rice paper and dip it into the water until it goes limp in the warm water, and then dunk the rest of the paper in, only for a few seconds or until it becomes very floppy and pliable.
Pull out and place on a plate try to get it as flat as possible.
Start to add some noodles, across the length of it on the edge closest to you, repeat with carrot, herbs, lettuce, shrimp and pork.
Next fold the sides of the rice paper over the mound and tuck and roll it, folding more rice paper inwards as necessary.
The paper sticks to itself so no need to worry about it coming undone.
Repeat for the rest of the rolls and serve with the hoisin sauce and srirracha for dips.

Wednesday, 17 July 2013

Chorizo and Potato Quesadillas

I know what you’re thinking, what am I doing in London trying to make quesadillas?! Well, thankfully they have tortillas here and lots of different kinds of cheeses so it’s easy for me to make something up! I had wanted to try this idea for a while, cubed Spanish chorizo with potatoes peppers and cheese, but what cheese was it going to be was the question? Since this was the biggest challenge, I had to do some research and tasting. I was wanting a bit of queso fresco, but since that wasn’t going to happen I made due with some Lancashire cheese, which is wonderfully melty and crumbly. I would suggest anyone getting Spanish chorizo for this, as Mexican chorizo is too greasy, and not firm like a sausage like Spanish chorizo. This recipe will make about 2 large quesadillas. Enjoy!

Ingredients:

4 large tortillas
1 chorizo ring (200g)
1 clove garlic
1 green bell pepper
1 chilli
½ onion
1 c. grated Lancashire cheese (or any melty cheese you like)
1 tbsp. oil

To Start:
Scrub the potato and poke holes into it with a knife, stick it in the microwave for 4 minutes. (You can fry it in the pan, but who has time for that?)
Dice the green pepper, chorizo and onion.
Crush the garlic.
Grate your cheese.
When the potato is done and cooled, dice it in small chunks.

To Cook and Assemble:

Heat a little oil in a pan until hot; when hot add the chorizo, potatoes, peppers, onion and garlic.
When the peppers are soft and the potatoes are crispy, turn off heat and set aside.
On a comal or cast iron skillet, heat the tortillas, after you turn them once, place some of the filling around the whole surface of the tortilla, top with grated cheese and place another tortilla on top.
Press down with a spatula making sure that the cheese melts.
Flip carefully (I recommend a very large spatula). Once flipped and the cheese is melted in keeping both tortillas together you can remove from heat and repeat for the next one.
Cut your quesadillas in four slices and enjoy!

Wednesday, 5 June 2013

Simple Spring Courgette and Parmesan Salad


Over the weekend I was looking for a light lunch snack type thing, and I came across a courgette. I had previously eaten raw courgettes, but I decided to do it up into a little salad and it was absolutely delicious. It’s really filling as well. It also helps stretch one ingredient to appeal to the eye as a generous amount of salad. This is very simple to make as it took barely any effort! As you can see the ingredient list quantities is just dependant on how you like it.  Give it a try; I am sure you will thoroughly be surprised.

 
Ingredients:
1 medium courgette (zucchini to anyone else)
Half of a lemon
Sea salt
Black pepper
Handful of parmesan shavings
Extra virgin olive oil

To assemble:
Wash courgette thoroughly, and chop off the ends.
Using a peeler (I have a Y shaped peeler), lay the courgette flat and begin to peel it into long strips.
When you’ve peeled nearly the whole courgette, lay it on a plate and spread out so the ingredients can get in all the crevices.
Shave your parmesan.
Sprinkle with some nice crunchy sea salt and pepper.
Squeeze the lemon all over the courgette strips, next drizzling a couple table spoons of the olive oil on top.
You can toss to combine but I didn’t.
Lastly sprinkle the parmesan shavings and enjoy!

Monday, 8 October 2012

Phở Bò (Beef Pho)

This is one of my favourite Vietnamese dishes, and I decided that I had to make it, I used a recipe and edited it to my liking. This is a very tedious dish that can take hours, but the results are completely worth it! It is a heart-warming Vietnamese soup that will sooth your soul. Enjoy!

Ingredients:
2kg beef bones
2 large pots for boiling water
2 large onions – skin on
1-2 large pieces of ginger –split in half
1 tsp. cloves
4 cardamom pods
2 4 inch cinnamon sticks
Handful star anise
50mls fish sauce (2/3 cup)
3-4 tbsp palm sugar
2 tsp salt
300-500g sirloin steak (or adjust per servings)
Rice vermicelli noodles


Garnish:
Bean sprouts
Limes
Coriander
Mint
Chillies
Thinly sliced red onion soaked in water
Hoisin sauce
Siracha sauce

To Start:
Bring to a boil two large pots full of water.
Once one pot is boiling, put the bones in and boil for 10-15 minutes to par boil or clean them.
While the bones are boiling split the onions in half along with the ginger (very rough) Put them under the grill in the oven until they get a nice char.
Once your bones have boiled for 10-15 minutes drain the water and rinse them off.

To continue to cook:
Add the rinsed bones to the second boiling pot of water (you can skip this two pot part but it’s better to have a pot of water ready boiling once the bones are clean)
Add the charred onions, and ginger.
Add the rest of the spices, cinnamon, cloves, star anise, fish sauce, cardamom pods. (save salt for last).
Simmer at a low heat for 8-10 hrs. (Overnight works best, but I would wake up and add more water and check on it if needed)

To finish:
Strain the mixture into the second pot over a cheese cloth. Until you have a nice clear broth.
Bring the broth back to a boil and immediately pour over thinly sliced steak pieces, cover with cooked rice noodle and garnish with desired garnishes.


Monday, 18 June 2012

Fabulous-Fresh-Fennel Salad

Normally I roast fennel with things like chicken, but this time I had a bulb and I thought I would try something fresh for summer. It turned out simply delicious even though I wasn’t sure if I’d enjoy the fennel-y, anise-y taste of fennel coming through. Regardless of my pre-conceived notions of what it might be, it was amazing! My next plan of attack was to serve it to my husband and get him to enjoy fennel again as I had burned him out on the roasted fennel thing, I was hoping to spark his interest in the salad and it worked! It will be served often on our table.

Ingredients:
1 large fennel bulb (or two small ones)
1-2 cups salad leaves for serving
½ red onion
6 radishes
Handful mint, basil, oregano (all fresh)
1 rib celery
1 tbsp. honey
Juice of one lemon
2 tbsp. olive oil
Salt and pepper
Fresh Parmesan cheese
2 fresh vine tomatoes
½ avocado

To Start:
Slice thinly with a sharp knife the top ends of the bulb of fennel off, and the root end on the other side.
Continue to slice as thin as possible, you can use a mandolin or a very sharp knife, add to bowl.
Slice thinly the red onion, radishes and celery.
Chop up all the herbs together to a fine dice and add to the bowl.

Next:
Mix up the dressing by combining honey and lemon in the bowl until combined.
Slowly add the oil and mix into a vinaigrette.
Salt and pepper.
Pour over fennel salad in the bowl and mix to combine.

To Finish:
On a plate lay a bed of salad leaves (arugula, baby salad leaves..etc.)
Mix up the fennel salad more and lay a large mound on top of the salad leaves.
Top with shaved parmesan cheese and pepper.
Garnish with tomatoes and avocado.
Enjoy!

Friday, 16 March 2012

Perfect Pesto Quiche

I had never made a quiche worth eating, but I was determined to throw one together with the leftovers I had in the house. I even made the crust! It was so much easier than I thought and even more delicious than I could have ever imagined! I suggest everyone try it, because of its simplicity. It’s so much better to eat a homemade quiche than a processed store bought one. Remember that this recipe was made on what I had available at the time, use what you have, even a pre-made crust, but I’d make sure to pick up the pesto! Serves 4!

What you’ll need (as a guide):

1 small chard (or 250g of leafy greens like spinach)
1 courgette (zucchini)
1 small head broccoli
½ red onion
3 cloves garlic
½ c. pesto
3 eggs
1 ½ c. milk
Salt
Garlic powder
Parmesan shavings for the top
1 tomato sliced
1 tbsp. olive oil

For the crust:
1 c. + 2 tbsp. flour (125g)
½ tsp. salt
¼ c. butter about 50g
2-3 tbsp. milk

Start the crust:
Get the crust started by mixing the cold butter into 1 c. flour and salt until forms small pebble sizes.
Slowly add milk until dough comes together. (You might not need all the milk).
When the dough turns stiff roll out on a very floury surface and lay in a 9inch pie tin. Set this aside and star the filling.

For the filling:
Dice chard, courgette, broccoli, onion and garlic.
Heat in a pan olive oil, and stir-fry all the diced vegetables until soft.
Turn off the heat and add the pesto and stir to combine.

To Finish:
Mix together eggs and milk and whip until well combined.
Add the cooled cooked vegetables to the milk and egg mixture.
Pour the mixture into the pie dish.
Top with parmesan shavings and tomato slices.
Bake at 190C or 375F for about 40-50 minutes or when it looks golden.
*To test that done stick a spoon in the middle and look for firmness.

Wednesday, 5 October 2011

Tomatoes, Basil and Roasted Red Peppers – Two Ways

This was made as an accident and worked two ways. It was originally supposed to be a sauce for my chicken and I added too many tomatoes and it ended up doubling as a soup starter. So, I will give ingredients and preparations for both. It's super easy, and super delicious! Sorry I don't have a photo, will post one next time I make it.

Soup Ingredients:
1 jar of roasted red peppers (drained)
1 can crushed/chopped tomatoes
1-2 cloves garlic
2 basil leaves
2 tbsp. yogurt
Salt/Pepper
Parmesan cheese

To cook:
Combine all ingredients and bring to a boil for 5 minutes.
Blitz with a hand blender until its soup consistency. (Be careful with the splash).
Garnish with a dollop of yogurt and Parmesan cheese

Sauce Ingredients:

1 small jar of roasted red peppers (drained)
¼- ½ can of chopped tomatoes
2 cloves garlic
2 basil leaves

To cook:

Combine all ingredients and bring to a boil for 5 minutes.
Blitz with a hand blender and serve hot over chicken, fish, pork or beef.

Friday, 19 August 2011

Gina's Tuna Pasta Mama

This recipe was requested by a couple people and here it is! There are a few ingredients that can be omitted or changed in quantity if you want more or less of it. I usually only make this for myself and use whole wheat fusilli pasta, and boil it for longer than it says so it turns soft enough to resemble white pasta with all the whole grain nutrition! Also if I keep my portion of pasta down I can compensate with veggies and get a couple portions of pasta salad! Try it!


Ingredients:
75g (per person ~3/4c) whole wheat fusilli pasta
1 can tuna drained
2 hardboiled eggs
1 tomato
Half green pepper
1 ribs celery
1 small can of black olives (~100-150g)
½ red onion
½ c frozen peas
3 tbsp. – ¼ c light mayonnaise
1 tsp. garlic powder
1 tbsp. of ranch dressing packet
Fresh pepper

To start:
Start the water to boil the eggs and continue until you peel them.
Start the water for the pasta, and continue until done.
Note: place the frozen peas in the colander and when you drain the pasta the hot water will thaw the peas.

To finish:
Fine dice tomatoes, green pepper, celery, onion, and egg and place into large bowl.
When the pasta is done add to the bowl, mix up with the seasonings and mayonnaise adjusting seasoning as you like.
This will keep well for two days.

Monday, 15 August 2011

Simple Tomato Basil Pasta Sauce

This came to me as I got some delicious tomatoes and basil in the veg box so I decided to make a light meal that turned out to be extra delicious and very simple with few ingredients. You can make this and store in the fridge for a few days. It would also be a great appetizer on top of toasted bread, or you can add shellfish. Get crazy. This serves 2.

Ingredients:
6 whole tomatoes (more or less depending on how big they are)
5 cloves of garlic (yes this has to be)
1 small onion
2 tbsp. olive oil
6-10 fresh basil leaves
Water for thinning out the sauce
Salt and lots of freshly ground pepper
Handful of parmesan cheese
~150g of fresh egg tagliatelle

To start:
Dice the tomatoes, onions, garlic.
Shred the basil.

To cook:
Heat the olive oil in the pan; when hot add the tomatoes, onion and garlic.
Turn down the heat to a simmer. Cook the tomatoes stirring constantly for 5-10 minutes.
Smash down the tomatoes as much as you can to release the juice.
If it cooks too fast and the juices run out you can add a little water to thin it out.
When it’s cooked down, add the basil, salt and pepper.

Serve over al dente pasta and sprinkle with parmesan cheese and more pepper.

Thursday, 30 June 2011

Grilled Caesar Salad with Scallops

At my wedding I had to choose different salads, and one of the options was this grilled Caesar salad. I had never thought about lettuce being grilled but it was amazing! It was the one I went with. This one isn’t exactly the same but just a take on it. I enjoy it as a starter to a light meal. I even made my own Caesar dressing to go with it. Serves 4 (but adjust for your needs)


Ingredients:
2 whole heads of romaine lettuce (Cos)
¼ c fresh grated parmesan cheese (50g)
150-200g (6-7oz) fresh scallops (any type you can find is fine, but if they are frozen make sure they are perfectly dry)

Dressing:

1 tbsp. light mayonnaise
¼ tsp. Dijon mustard
Fresh pepper
¼ tsp. Worcestershire sauce
Half lime juice
2 anchovy fillets (omit if you want but they only add flavour!)
2 tbsp. good olive oil

Blitz this all up in a blender or food processor and there’s your dressing. If it’s too thick, just add a little water. The fun of cooking is winging it, little of this little of that.

To grill the lettuce and Scallops:
Heat a grill pan, and add oil or spray oil.
Salt and pepper the scallops
Trim the tops of the lettuce that might look too dark, however do not chop off the bulb at the bottom that keeps the stock together.
Slice them down the middle.
Brush with a little olive oil and salt and pepper.
Once the pan is hot, add the lettuce flat side down. (I can only fit two at a time in my pan)
Lay the scallops around in the empty areas of the pan, and carefully turn once a brown crust has formed, they cook very fast.
Turn the lettuce once when the scallops are turned and voila they should be done!

Top with Parmesan cheese and my dressing and enjoy!