Showing posts with label brunch. Show all posts

Friday, 27 February 2015

Easy Bacon Jam

Bacon jam. It doesn't really need much explaining. It's sweet and savoury and all things you could expect from two really wonderful things that you can put on bread. I found this especially delicious as an addition to cheese on toast, and just toast.

Before I made the recipe fit my own standards I did a lot of looking at a lot of different recipes. I used what I had and what flavour profile I wanted to get out of it. I just happened to have a bottle of wild blueberry maple syrup so I decided to use that. I really think that anyone could get by without this and just use regular maple syrup and be just fine. I also decided at first that this would be a slow cooker recipe, but it just didn't transpire in translation when I actually went to make it. I made the first few parts or so in a pan, and then transferred. I was very impatient and did not want to leave this to boil away for 8 hrs!! Even though I gave it a go, but it was too slow!! So I just took it out, transferred it to a small pan and boiled the crap out of it until it was a sticky slimey yummy ooey gooey jam! The ingredients for this makes a small jar full, or about 10 servings (I use about a tablespoon per slice of toast). You could easily double it, and it would be a fantastic artisan gift! Enjoy!
bacon jam
Particularly good with cheese! :)

Ingredients:
400g smoked streaky bacon 1cm pices
¼ c. dark muscovado sugar (regular brown sugar is fine)
½ c. Jack Daniels Honey (regular Jack Daniels is fine too)
¼ c. blueberry maple syrup
½ c. espresso or coffee
200g onions diced
¼ c. apple cider vinegar
4 cloves garlic

Method:
Cut up all the bacon into small strips of 1cm.
Dice the onion and garlic.
Get a pan roaring hot.
Start to render the fat on the bacon by placing them in the hot pan and stirring constantly.
When your bacon is crispy and golden drain off all the fat either by spooning it out or using a lot of paper towels. Make sure you've got most of the fat out.


Next add in the onions and garlic and stir fry for about 5-10 minutes on medium heat.
Next add the muscovado sugar and stir through until you have coated the onions and it's starting to look sticky.
Crank up the heat and add in the Jack Daniel's until reduced by half, then add in the maple syrup, coffee and vinegar.ink
Bring up to a rolling boil and then turn down and simmer stirring frequently for about 1hr or unti all of the liquid is gone and you just are left with jam.

*****Note: did not use a slow cooker a
fter all, even though it shows one in the photo


Monday, 26 January 2015

Vegan Sticky Orange Cake

sticky vegan orange cake
Vegan Sticky Orange Cake w/ Orange Drizzle!
So, first of all, I'm not vegan.I have to get this off my chest, because I hate the stigma associated with vegan food. You tell someone that you've made something vegan and they automatically frown and think “Ew gross you're feeding us wheatgrass and chia seeds!” I don't understand this stigma. In fact I don't understand why there's such a dependence on meat and animal products in general. If I really think about eating animal biproducts I can really make myself sick. This is why I don't. I tend to eat higher welfare meat when I do eat it, and I am generally careful about where I source ingredients. It's in your best interests to keep watch over things that go into your body instead of becoming completely complacent about things!!

Ok rant over, now that we're past my little rant, I want to talk about my orange cake. I have had in my mind for a while now that I wanted an orange cake of some kind. I know the fundamentals of a plain sponge and I can make one quite easy, but I really wanted to use some ground almonds and...I wanted to keep it healthy, and maybe vegan. So I did a little research on how to lighten things up and how to substitute eggs in a cake. Apparently it's really easy to do as I've found out. While the cake isn't exactly what I was going for in my mind, it definitely turned out to be a great treat and I will definitely try to use the base of the recipe as a blank canvas to try many other confections. The best part about this cake is there's nothing weird and wonky in it to get it moving or to get it the right texture or whatever.

sticky vegan orange cake
*Disclaimer: Ok, so here's the thing, baking is somewhat of an experimental thing for me, and this cake was no different. I originally took the cake out of the oven too soon even though the toothpick came out clean. It had risen really high so I took it out and shot lots of photos. I came back a few minutes later and it completely fell in the centre bc it wasn't done! OOPS. I put it back in the oven and cooked it but I couldn't save the soggy middle...so I decided to cut it out with a ring mould and make it a bundt cake ut I'm sure it will be fine next time. I just was careless!!

Enjoy!

sticky vegan orange cake
Ingredient List
Ingredients:
1 ½ c. plain flour
½ c. ground almonds
1/3 c. oil (I used sunflower)
¾ c. white granulated sugar
½ c. brown sugar (I used dark muscovado)
1 ½ tbsp. Cider vinegar
1 ½ tsp. Baking soda
½ tsp. Salt
Zest of two oranges
250ml orange juice


For the Glaze: (I winged this, you can try whatever you want)
1c. icing sugar
½ c. orange juice
50g sliced almonds

To Start:
Very important to pre-heat the oven to 175C or 350F
Next measure out all of the ingredients so you're ready to mix.
Prepare the pans for baking

To Mix:
First mix together flour, ground almonds baking soda, salt.
In a larger bowl, mix together oil, orange juice, orange zest, sugars, vanilla, and cider vinegar.
Mix thoroughly and quickly add in the dry ingredients and mix to combine.

To Bake:
Pour into your prepared pans as soon as possible and get it into the oven.
Bake for 45-1hr.
Depending on your oven, check at 45 minutes and remember my disclaimer – it will look risen enough. Be absolutely sure before you pull it out.

For the Glaze:
Sift icing sugar into a small pan.
Add the orange juice and wisk heavily to remove any lumps.
Bring to a boil and boil down to a thick syrup.
Add almonds and optional orange zest and drizzle on your cake.
sticky vegan orange cake
Dollop Greek Yogurt :)

Tuesday, 4 November 2014

Filo Wrapped Salmon with Pesto

This is a recipe revamp today and I'm surprisingly excited to share it. It was good when I wrote it about 4 years ago and it's been one of my most popular recipes. The original photo is here but, I decided to re-photograph it and just revisit it to make sure it still tasted good! And from my new perspective on food and eating, I needed to see if it would fit in my diet! To be honest, it didn't fit in my daily week day meal plan because it just tipped the scales over 500 calories per portion, which is too steep for me. But it's a great weekend meal for me and lower calories than most of my weekend meals. Anyways, forget about that. It was delicious. I added pesto to the salmon to give it a nice twist. The nice thing with pesto is it has a nice flavour, even though it's high in calories and fat, you only have to use a tiny bit to make the flavour go far.

I have a bit of a love/hate relationship with salmon. I actually think it's one of the most boring fish out there. I personally don't think it's very versatile. It's one of the stronger flavoured fish, not that it tastes fishy but it has a distinct flavour. If I'm going to eat it, I normally have it on it's own without anything else with a strong flavour like simple boiled potatoes and a salad. Today with the pesto I just had some steamed broccoli along side. You use whatever you have and you should be right as rain. Try this recipe if you want a twist on salmon.

filo wrapped salmon with pesto
Serve hot with fresh vegetables.
Ingredients:
2 125g salmon fillets skin removed
2-3 tbsp. Pesto
6 filo sheets

Method:
Since you have to work with the filo dough simply make sure all of the ingredients are at hand and ready to go.
Lay out 2-3 sheets of pastry and brush a tiny bit of the pesto around the edges.
Lay the salmon at the bottom of the square or recatangle.
Spoon 1 tbsp of pesto on top of the salmon, and fold the ends over the salmon and then roll it up.
Repeat for the next one.
Brush the tops with any remaining pesto.
Bake at 200C for 20 minutes.

The 21st Century Housewife Hearth and Soul Blog Hop

Tuesday, 2 September 2014

Low Fat Coronation Chicken Wraps

When I first came to England, I tasted so many interesting things. One thing was this ‘coronation’ flavour. It’s essentially any kind of curry flavoured mayonnaise based mixture that can be a rice salad or a chicken salad or even egg salad. Basically delicious and I wanted to make up a recipe and see how it goes! This recipe makes about 4-6 depending on how big your tortilla wraps are. I think the bigger ones are better. This is also really great for a fabulous picnic with the last few hours of sunshine left in England! Enjoy!
Have you ever had curried chicken wraps?

Ingredients:
500g chicken breast
1 tbsp. madras paste
1 tsp. curry powder
2 tbsp. light mayo
3 tbsp. Greek non-fat yogurt
150g grapes
25g flaked almonds
¼ c. raisins
2 ribs celery
3 spring onions
Salt + pepper
4-6 tortilla wraps

To Start:
Get a pot of water going and boil the chicken breasts for 10-15 minutes until cooked through.
Slice the grapes in halves or quarters depending on size.
Slice thinly the celery and green onions.

To make the Coronation Mayo:
In a medium bowl combine madras paste, curry powder, mayo, yogurt, and salt and pepper. Stir to combine.
Next add in the raisins, almonds, grapes, celery and spring onions.
Mix thoroughly checking for seasoning.

To Finish:
Drain the chicken off and let cool before dicing into chunks.
Fold into the mayo mixture and wrap it in tortillas.
Eat it or pack it away for a picnic!

Wednesday, 27 August 2014

Tiramisu Cupcakes

What can I say? Who doesn't love tiramisu AND cupcakes?! Combine the two and I have a total winner! Seriously, I don’t know where my sweet tooth came from. I think it came from moving to the UK because I never had such a taste for sweets. I had some lady fingers in the cupboard that I as going to make a killer tiramisu recipe out of, but when I was looking at the ingredients, I just was thinking, “Why don’t I try to make cupcakes out of it?” Lately I’ve been on a cupcake kick. Any type of cupcake I want it. Since I’m still improving my baking skills it’s a bit of a hit or miss, but this certainly was a hit! I nearly ate all of the cupcakes I made, luckily I gave some away! There is some alcohol and coffee in this recipe so you can use it as a great excuse not to share any with the kids! This recipe makes 10. Enjoy!
tiramisu cupcakes
Delicious, and for more authentic look, dust with cocoa powder :)


Ingredients:
150g butter soft room temperature
150g self-rising flour
150g caster sugar
3 eggs
½ tsp. baking powder
Pinch salt
½ tsp. vanilla
1 tbsp. strong espresso - cold
1 tbsp. marsala wine

Icing:
125g mascarpone cheese room temperature
50g butter soft
1 tbsp. marsala wine
1 tsp. cocoa powder
300-500g icing sugar

To Start:
Heat oven to 180C
Cream together butter sugar and eggs until light and fluffy.
Next add in the vanilla, espresso and marsala wine.
In another bowl sift together salt, baking powder and flour.
Mix in with the wet ingredients a little at a time until everything is incorporated.

To cook:
Bake the oven for about 12-15 minutes or until a toothpick is inserted clean. Oven times vary so watch them closely.

For the icing:
Make sure that everything is room temperature.
First cream together the butter mascarpone cheese.
Sift in the cocoa and mix to combine.
Next add in the espresso and the marsala wine mix until creamy.
Add icing sugar a little at a time until it becomes a thick consistency that you would like to ice the cakes.
Ice and enjoy!

Friday, 22 August 2014

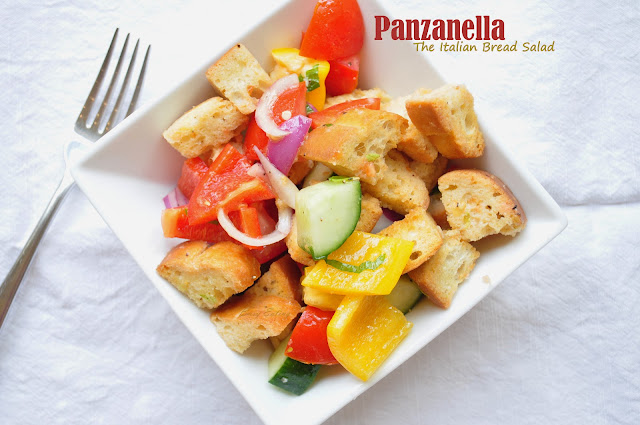
Easy Fresh Panzanella with Mint and Marjoram

What is it? It’s an Italian bread salad, made with hot croutons freshly made, then sauced up with a delicious vinaigrette and fresh veggies and herbs. It’s absolutely delicious on a hot day or easily taken on a picnic. I bet it would even go nicely with a grilled piece of chicken or fish. I got the herbs from my garden but you traditionally use basil, but since I didn’t have any I just improvised and it was fantastic. It’s best when the croutons are fresh hot out of the oven, but just as delicious after resting at room temperature. This recipe makes about 4 servings but you can easily double it for 4 large portions. Enjoy!
italian panzanella with mint and marjoram
Fresh and healthy!

Ingredients:
200g baguette (rustic baguette preferred and slightly stale)
2-3 medium tomatoes
1 small red onion sliced finely
½ yellow pepper sliced
½ red pepper sliced
½ long cucumber
4 tbsp. olive oil (1 for toasting, 3 for dressing)
½ tsp. Dijon mustard
3 tbsp. white wine vinegar
1 clove garlic
Few sprigs mint and marjoram
Salt and pepper

To start:
Cut the baguette into 1x1inch cubes. Make sure your bread is crusty and stale if it isn’t cut into cubes and leave to rest for 1hr before toasting.
Drizzle 1 tbsp. of olive oil around and salt and pepper tossing it with your fingers to combine.
Put in a 200F oven for about 10 minutes, watch them so they don’t burn!

For the Salad:
Dice the tomatoes, peppers and cucumbers in nice big chunks.
Make sure the onions are sliced finely.
Finely chop the herbs
Salt and leave aside.

For the Dressing:
Whisk 3 tbsp. oil, vinegar, Dijon mustard, garlic until well combined.
Add the herbs and stir.

To Combine the Salad:
When the croutons are hot out of the oven mix them with the vegetables.
Next dress the salad with the dressing and stir to combine.
Stir well so that the dressing gets absorbed by all of the croutons.
Enjoy!

Friday, 15 August 2014

Middle Eastern Style Veggie Burgers with Pickled Red Onions

This is a recipe revamp from my old collection. I previously called them baba ghanoush veggie patties but I realized when I was retesting the patties that they’re much broader than that because they’ve got goats cheese in them. Regardless of that they still came out just as delicious as before. I also wanted to add some zing to them, and made some pickled onions to go with the patties. These are amazing and can go with anything. They’re much like the pickles you’d find in Texas on carnitas tacos. I also used them to serve alongside some pulled pork. They’re pretty versatile and really nice to snack on. The recipe for the burgers makes about 6.
Middle Eastern Style Veggie Burgers
Delicious in a burger or on it's own.

Ingredients:
1 400g tin cannellini beans – drained and dried
1 medium aubergine
1 medium red pepper
125g goat cheese
50-75 bread crumbs (Or 2-3 slices of white bread whizzed up in the food processor)
1 egg
½ tsp. garlic powder
½ tsp. cumin
¼. tsp. paprika
¼ tsp. turmeric
Salt to taste
Handful of cilantro
Oil to fry

To start:
Slice the eggplant and red pepper in half, roast in the oven with a little oil until soft and mushy.
Drain the beans and rinse. Drain thoroughly.
In a food processor whiz the beans, goats cheese, roasted aubergine, red pepper and spices and half of the bread crumbs.
When combined add the egg and whiz again.
Depending on how wet this batter is adding some more breadcrumbs as needed. The consistency you’re looking for is of thick pancake batter.

To cook:
Heat a couple of tablespoons in a pan until very hot.
You’ll want to spoon the batter in the hot oil.
Make the patties the size you desire and cook for 3-5 minutes on each side.
These will be very delicate so take care when flipping.

For the pickled onions: (Note: Adapted recipe from here.)
100g thinly sliced red onions
1 medium cinnamon stick
½ tsp. red pepper flakes
Juice of one lime – if it’s not juicy enough use two.
1 c. apple cider vinegar
75g caster sugar
1 tablespoon salt

Method:
In a small saucepan bring all of the ingredients slowly up to a bowl so that the spices have time to steep and the sugar has time to dissolve.
Blanch the onions for 10 seconds with freshly boiled water and drain immediately.
Shove the onions into a jar.
When the sugar is dissolved in the brine pour carefully over the onions and let sit until room temperature.
When cool cover and refrigerate for up to a week.
After 10 minutes in brine it's ready!

Friday, 8 August 2014

Curried Piccalilli Scotch Eggs with Curry Ketchup

Who doesn’t love a scotch egg? I know I do! I have made a few attempts at making them but it always turned into a disaster. I watched a few videos on how to do the breading and I think I have it down! I wanted to incorporate the traditional dip ‘piccalilli’, that goes with scotch eggs, into the actual sausage meat. If you’re willing to take a little time to make these they make great picnic accompaniments. They’re rather large so you can assume it will fill you up! I could easily split one with someone else on a picnic. This recipe makes 4, and unfortunately it’s hard to make them any smaller because the eggs are quite large to begin with. It was a bit of a messy job making these so it was harder to photo the entire process, so I only have the end result. Enjoy!
Curried Piccalilli Scotch Eggs
Delicious oozy runny yolks :)

Ingredients:
500g lean pork mince
200g piccalilli (chopped up very finely)
8 large eggs (4 for breading 4 for boiling)
2 tbsp. curry powder (reserve 1 tsp. for the curry ketchup)
4 large eggs
200g bread crumbs (or about 5 cups)
150g seasoned flour
Oil for frying
Cling film
½ c. ketchup to serve

To Start:
Get on a pot of water to boil.
When the water is boiling gently put the eggs in and boil for six minutes exactly. Take out and run under cold water; peel and set aside.

To Prep:
Pull out 4 large pieces of cling film; set aside.
Make breading stations, 3 bowls with b
Next chop the piccalilli as fine as you can and mix it with the pork mince.
Divide in four equal portions.
Place one portion on a piece of cling film and press out into a circle.
Place the egg in the middle and bring the cling film together, twisting tight and bring the meat to the egg covered completely.
Repeat for all eggs, and refrigerate for 1hr.

To Bread: (THE MESSY PART)
Take the chilled sausage and eggs out of the fridge, dip in the flour first, then into the egg, then into the bread crumbs.
From the bread crumbs, toss back into the egg to coat, and then back into the breadcrumbs.
Set aside while you do the others, and refrigerate for another 30 minutes.

To Cook:
Heat your oil to about 180C – I did not have a temperature gadget so I just eyed it.
They should take about 6-8 minutes until golden brown.
When done remove and let sit on a paper towel for 20 minutes before digging in as they are hot!

For the curry ketchup:
In a small saucepan, heat up the ketchup and 1 tsp. of curry powder just until heated through.
Let cool and use for dipping the egg!

Wednesday, 6 August 2014

Moist Raspberry Blueberry Bundt Cake with Lemon and Greek Yogurt

I made this cake last year and decided to tweak it a little to my needs. It was inspired by a blueberry bundt cake I found online and tweaked it then I tested it on my husband, and before he tasted it I gave some to my neighbour to taste. Both of them told me that they didn’t want to share it and that I should make more! It was by far the moistest cake I’ve ever made from scratch and I was really impressed at my own skills, which are completely null when baking! IF you want to impress your guests, or family, and are not an especially great baker this is the cake for you. It’s absolutely gorgeous with a cup of tea! Makes about 16 servings.
Rasberry Blueberry Bundt cake with Lemon and Greek Yogurt
Delicious and Moist!

Ingredients:
300g self-rising flour
225g room temperature butter
200g dark brown sugar
100g Half spoon granulated sugar (**If using regular sugar use 200g)
½ tsp. salt
1 tsp. baking powder
1 cup zero fat Greek Yogurt
4 eggs
1 tsp. vanilla
Zest and juice of two lemons (one lemon if it’s big)
400g frozen berries (blueberry/raspberry)

To Start:
Pre-heat oven to 180C (350F)
Sift 275g flour, salt, baking powder in a bowl and set aside.
Cream together butter and sugars until light and fluffy in a large bowl.
Zest and juice the lemon into a bowl, mix with yogurt and vanilla.
Next add the yogurt mixture to the butter and sugar and stir until thoroughly incorporated.
Follow by adding one egg at a time until completely combined.
When combined add half of the flour mixture and when combined add the rest until mixed.

To Finish:
Mix the berries with the remaining flour and fold them into the batter.
Pour into a greased bundt pan, and put into a hot oven.
Bake for 40-50 minutes. Every oven is different so after 40 minutes prick with a tooth pick.
You can top this with any kind of sugar glaze or eat on its own. I prefer it on its own!
Perfect and moist with a cup of tea!

Monday, 12 May 2014

The Egg and the Asparagus

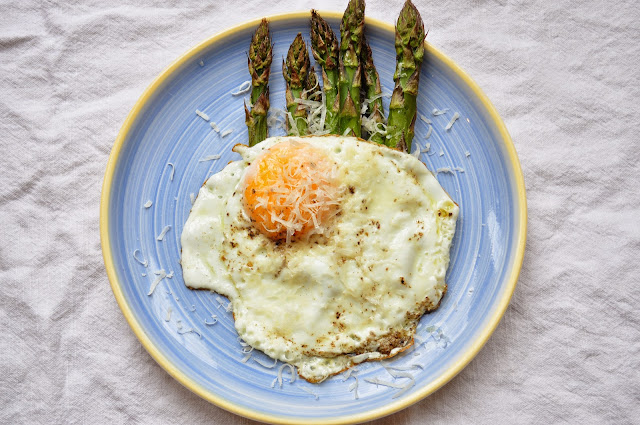
There’s nothing better than simplicity, and right now that simplicity is a runny egg yolk, so velvety and smooth. It was made to have things dipped in it, or covered in as lush sauce. One of the other things I love along with eggs is asparagus. They go so well together, maybe even with a little Italian prosciutto, perhaps some sun dried tomatoes? There isn’t much to this recipe; in fact a lot can be left to the imagination here. For me, I’m going with just three ingredients and I know that everyone will know how to make a fried egg, or roasting some veg. It’s a simple fried egg on top of roasted asparagus with a touch of shaved parmesan right on top for seasoning. This makes a fantastic brunch, or starter. Super simple and super delicious when it’s in season! Serves 2.
Asparagus with a fried egg and parmesan.
Delicious yummy yolk. :)

Ingredients:
400g fresh asparagus
2 large eggs
20g parmesan cheese
Oil

To Start:
Heat an oven to 200C (400F)
Cut off the woody bottoms of the asparagus and peel the ends off a bit with a vegetable peeler.
Drizzle with about ½ tbsp. extra virgin olive oil.
Season with salt and pepper.
Stick in to roast for about 15-20 minutes.

To Finish:
When the asparagus is done, heat some oil in a non-stick pan.
Lightly drop the egg in and fry it ‘Sunny side up’.
Make sure to leave the yolk runny.
Arrange on a plate the asparagus and egg, top with lashings of shaved parmesan and serve.

How easy is that?!

Friday, 25 April 2014

Caramelized Red Onion and Mature Cheddar Portobello Mushroom Quiches

I was thinking the other day that I don’t particularly love mushrooms, even though I generally use them quite a lot. I tend to try to think of other ways to use ingredients I don’t particularly like. I got a tip from a few websites and read no further, I decided to just try on my own. I’m not particularly brilliant with quiche either. But I decided to give it a go. They came out absolutely amazing! So yummy, and for me a great way to use a Portobello! If you give this a try I guarantee you that you can come up with something fantastic and imaginative with the ingredients. I decided to go for a simple vegetarian cheddar and onion, but the possibilities are endless! I can even vouch that these are extremely healthy and low fat and low carb. I don’t generally cut out carbs but when it’s this good why not? This is for 2 people and could be easily easily doubled, and perfect for lunch, or a impressive brunch!
Mushroom Quiches

Ingredients:
3-4 large portobello mushrooms
2 eggs
½ c. milk
1 red onion
50g frozen spinach thawed (optional)
30g grated mature cheddar
Salt and pepper to taste
1 tsp. sunflower oil

For the Accompanying Salad:
2 salad tomatoes
½ cucumber
Handful mint and coriander
Red wine vinegar

To start:
mushroom gills removedPreheat oven to 180C
Heat a pan with the oil.
Dice your red onion finely and add it to the oil stirring frequently and remove from heat when caramelized.
Begin to clean out the mushrooms, remove stem and use a spoon to scrape out the gills, until you have nice little ‘bowls’.
mushroom gills removed layered with spinach and red onion
To Finish:
Mix the eggs and milk with salt and pepper until frothy.
Place spinach, the caramelized onion and a bit of cheese on the bottom of each mushroom.
Top with the egg mixture. (This can be tricky as some mushrooms are split and might have spillage, take care to lean them up against something so it doesn’t leak out).
Place in a hot oven for about 30-45 minutes depending on your oven.

For the Salad:
Slice the onion very thinly and soak in a few dashes of red wine vinegar.
In a separate bowl combined cubed cucumber and tomatoes, and salt liberally.
Chop the herbs, and then combine all of the ingredients and it is ready to eat.

This recipe was brought to you by the onion challenge at The Spicy Pear , and Citrus Spice UK