Friday 27 February 2015

Easy Bacon Jam

Bacon jam. It doesn't really need much explaining. It's sweet and savoury and all things you could expect from two really wonderful things that you can put on bread. I found this especially delicious as an addition to cheese on toast, and just toast.

Before I made the recipe fit my own standards I did a lot of looking at a lot of different recipes. I used what I had and what flavour profile I wanted to get out of it. I just happened to have a bottle of wild blueberry maple syrup so I decided to use that. I really think that anyone could get by without this and just use regular maple syrup and be just fine. I also decided at first that this would be a slow cooker recipe, but it just didn't transpire in translation when I actually went to make it. I made the first few parts or so in a pan, and then transferred. I was very impatient and did not want to leave this to boil away for 8 hrs!! Even though I gave it a go, but it was too slow!! So I just took it out, transferred it to a small pan and boiled the crap out of it until it was a sticky slimey yummy ooey gooey jam! The ingredients for this makes a small jar full, or about 10 servings (I use about a tablespoon per slice of toast). You could easily double it, and it would be a fantastic artisan gift! Enjoy!
bacon jam
Particularly good with cheese! :)

Ingredients:
400g smoked streaky bacon 1cm pices
¼ c. dark muscovado sugar (regular brown sugar is fine)
½ c. Jack Daniels Honey (regular Jack Daniels is fine too)
¼ c. blueberry maple syrup
½ c. espresso or coffee
200g onions diced
¼ c. apple cider vinegar
4 cloves garlic

Method:
Cut up all the bacon into small strips of 1cm.
Dice the onion and garlic.
Get a pan roaring hot.
Start to render the fat on the bacon by placing them in the hot pan and stirring constantly.
When your bacon is crispy and golden drain off all the fat either by spooning it out or using a lot of paper towels. Make sure you've got most of the fat out.


Next add in the onions and garlic and stir fry for about 5-10 minutes on medium heat.
Next add the muscovado sugar and stir through until you have coated the onions and it's starting to look sticky.
Crank up the heat and add in the Jack Daniel's until reduced by half, then add in the maple syrup, coffee and vinegar.ink
Bring up to a rolling boil and then turn down and simmer stirring frequently for about 1hr or unti all of the liquid is gone and you just are left with jam.

*****Note: did not use a slow cooker a
fter all, even though it shows one in the photo


Tuesday 24 February 2015

Easy Chicken Mexican Pizza

Ok, so there's nothing gourmet about this dish. It's just a simple craving that I had and I know that this isn't even close to the real thing. Sometimes you just want junk on a Friday don't you? Back hom we have 'Taco Bell', I have't really been there in probably 10 years or so but sometimes I get a hankering for the idea of things. For this it was their 'Mexican Pizza', simply put a few tortillas with beans, grouned beef, some spices and cheese. I'm sure that this is utter garbage and will make your stomach churn with discomfort at the thought of the calories and nutrirtional value but I decided to do my own take on it. Obviously taking inspirations from all places sometimes leads to really good ideas!

Anyways, back to the recipe. For me, I decided to go with chicken on this one, and decided to take inspiration from my mom's chicken tacos, which I remember as a kid and really miss the flavour. I'm sure I can't recreate it near as good as I'm lacking in most of the spices, but you boil the chicken until well done, let it cool, debone it and then refry it with a bit of the water it poached in and some spices. Probably not the easiest dish I've ever made on a Friday as it was a bit time consuming with the chicken but if you wanted to do something else that's easier, like mince beef, or even precooked chicken that you buy, anything will work. I also mashed my own beans which makes a bit more work but I enjoy it anyways. So here's my Mexican Pizza as inspiration for a plethora of any other ideas you might have. This recipe serves two but could easily be made to suit your needs.
Chicken Mexican Pizza
Oh, I forgot the sour cream in the photo! MMM

Ingredients:
200-300g cooked chicken meat (from about 500g boned meat)
1 400g black beans
2 onions
4 tortillas
1-2 cloves garlic
1-2 tbsp chilli powder
1 tsp. Cumin
salsa to taste
150g shredded/grated cheddar
chopped scallions, lettuce and tomatoes for garnish
Guacamole and sour cream to serve

To Start:
I started by boiling the chicken for about 45 minutes with onions, garlic salt and lots of pepper.
Take it out and cool it for about 30 minutes before deboning.
While all this is going on, open a tin of beans and drain until almost all the liquid is out.
Place in a small sauce pan and turn the heat on high and mash with a masher, adding the cumin and 1 tbsp of chilli powder.
You can add small spoonfuls of the chicken stock water if it gets too dry. If there is too much liquid just continue to slowly boil it off.
Cook these until a nice creamy consistancy and then turn off the heat.
For the chicken, when deboned place in a pan with a little bit of the broth, a freshly chopped onion and garlic and 1 tbsp of chilli powder.
Boil on high for about 10 minutes continuously adding the broth to keep the chicken hydrated.

To Assemble:
Fire up the grill to full blast and line a baking tray with foil.
Place the tortillas under the grill for a few seconds to get heated through.
Spread the bean mixture over the tortillas.
Next pile on the chicken and cheese and put under the grill for a few minutes or until cheese is melted.
Top with the other tortilla and spread salsa and more cheese and put under the grill again to melt
Finish with scallions, salad, guacamole and sour cream.

Thursday 19 February 2015

Authentic Tex-Mex Salsa

So the thing with salsa is, everyone and their mom has their own recipe to calltheir own. I am no different from this. In fact, almost every time I make salsa, it ends up being a different variation of this recipe. Simply because salsa is something you make with what you have. Sometimes you might not have fresh coriander, or sometimes you're out of fresh tomatoes and want to use a tin. I don't care what way I make it as long as I have some on my breakfast tacos. Oh yea, breakfast tacos, that's something that Brits will never get. Breakfast tacos are a thing, call it a wrap, call it a burrito, but get on this. It will change your life after you scramble up some eggs with bacon or potato and throw it in a tortilla and shove it in your gob, with some salsa of course. The possibilities are endless with salsa. Anyways, I love salsa. Lets get on to the recipe.

*Disclaimer –I can not verify these chips. They're Doritos lightly salted, which back home would be an absolute travesty to use with chips and salsa, but being in the UK Doesn't afford me much luxuries in the corn tortilla department. This is also something we need to get on as a nation. #soapbox over.

Anyways, lets get to it.
authentic tex-mex salsa
Delicious with chips and a margarita!
Ingredients:
400 ripe tomatoes
½ green pepper
1-2 chillies
3 cloves garlic
1-2 onions
A couple of handfuls of coriander (cilantro)
Pinch of cumin (optional)
1 tsp. Ground pepper
1 tsp. Salt (or to taste)

Method:
First chop up the chillies, pepper, garlic, onions and half the coriander.
Put in a saucepan to boil with about 300ml of water.
Add some salt and the pepper.
Bring to a boil and boil vigorously until the pepper has faded from bright green to dark green or the water is evaporated by more than half.

To Finish:
Chop up the tomatoes into big chunks and boil them for about 5 minutes until soft.
Then set aside, to cool for about 20 minutes.
Use a hand blender to blend it up into a nice runny consistancy.
You can leave it chunky but for purposes of being authentic we want a nice watery texture.
Check for seasoning and serve with some chips and drink my pineapple cocktail!

*Note - depending on your ingredients, this salsa will come out more red or more green, or sometimes if you use tinned tomatoes it will be a lot thicker.

Monday 16 February 2015

Super Easy Thai Style Meatballs

I really like meatballs. They're super easy to make and really good to take to a party for appetisers and best of all they're really cheap. You can throw just about anything into some mince meat and come up with some pretty fantastic combinations! I happened to have some pork mince and some Thai style ingredients leftover from a green curry that I made and I wanted to experiment!

I also put together a little BBQ style sticky glaze to go on top which was really yummy and tasty. I glazed the meatballs at the last five minutes of cooking and then used the rest as a dipping sauce and it was really delicious.

It's really easy to make meatballs in the oven in muffin tins. Just spray a bit of nonstick spray and toss em in! It's a nice trick instead of frying them in a pan with lots of oil. Just let them cool completely before you scrape them out! The glaze that I made to go over them would go with a wide variety of things including chicken wings and BBQ ribs with an Asian flare. This recipe makes about 15 meatballs, but obviously can be doubled and trippled! Enjoy!
Thai style pork meatballs with sticky glaze
Time to party!
Ingredients for the Balls:
250g lean pork mince
1 tsp. Bart lemon grass paste
2 tbsp. Chopped green onions
1 egg
1 tsp. Grated ginger
1 tbsp. Chopped coriander
¼ tsp. Korean red c hilli flakes (optional)
½ red chilli (depending on how spicy you want it)
1 garlic cloved minced
½ tsp. Salt
1 rice cake (I used this for binding, you can use a slice of bread)


For the Sticky Glaze:
¼ c. hoisin sauce
3 tbsp. Brown sugar
¼ c. sweet chilli sauce
2 tbsp. Soy sauce
2 tbsp fish sauce
2 cloves garlic minced
1 tsp. Freshly grated ginger


For the Balls:
Preheat your oven to 200C
Get your ginger grated, chop the coriander, chilli, green onions and garlic.
Mix the pork with all of the ingredients and mix thoroughly.
Spray a muffin tin with nonstick spray, and roll the mixture into balls and place in there.
Cook for 15 minutes.
Then glaze and cook an additional 5 minutes.

To make the Glaze:
While the balls are cooking in the oven, mix all of the ingredients together in a small saucepan and bring to a boil.
Turn down and simmer for about 5 minutes.
Next turn off heat and use for the glaze or dipping.
They make great party food!

Friday 13 February 2015

White Chocolate w/ Basil and Milk Chocolate Dipped Strawberries

For as long as I can remember, I have always gotten chocolate dipped strawberries around Valentine's day at my neighbourhood HEB store back in Texas. Who needs a holiday to like chocolate dipped strawberries? I sure don't! I decided I would try my hand at them just for funsies because I know a lot of other people want to do special things for their loved one on this particular time of year. I just want to eat them all, and I think I will try them again when strawberries are at their best and in season. I had such a fun time making these, I really got dirty and got to lick all of the chocolate off my fingers, it was great.

I decided to use milk chocolate and white chocolate, and for added fun I chopped up some fresh basil finely and sprinkled it on top of the white chocolate dipped strawberries. What a nice treat! It is a nice compliment together but you could use things like mint or taraggon. So many times we think of herbs as savoury and only mint gets used in sweet things. Well not today folks! Go on then give em a try!
White Chocolate and Milk Chocolate dipped Strawberries
Yum!

Ingredients:
1k fresh strawberries washed and dried thoroughly
100g Green & Black's white chocolate
100g Green & Black's milk chocolate
A few basil leaves
2 medium heat proof pyrex dishes


To Start:
Chop up your basil.
Set up a double boiler by getting a small saucepan with about 1 inch of water on the hob to simmer.
Bash up all your chocolate – I used milk first.
When the water has just started to simmer, turn it down to low and put the glass bowl on top and add in your chocolate.
To get it melted it will take about 5-10 minutes.
When it's all melted take off the heat and set aside to rest for about 3-5 minutes.
You can then put the white chocolate in a pan the same and get it melting.

To Dip:
If your strawberries have stubborn stems, you can use toothpicks to poke in them to hold the strawberry while dipping.
Don't for get about your white chocolate, keep on stirring until smooth.
Take a spatula and scrape all the chocolate to one side of the bowl.
Take the strawberry and gently press it into the hot chocolate and twirl it around until it's covered.
Let it drain off a bit and then put it on a rack or someplace that it can get cool.
Repeat until you have the desired amount of milk chocolate strawberries you want.
While your white chocolate comes to perfect melting repeat the same for the strawberries and sprinkle some with basil if you like.
Also for decoration you can take your spoon and dip it into the white chocolate and drizzle on top of the milk chocolate ones.
And also you can drizzle the milk chocolate onto the white ones.
Chill in the freezer for 30 minutes before eating. Or refridgerate for 1hr.

Thursday 12 February 2015

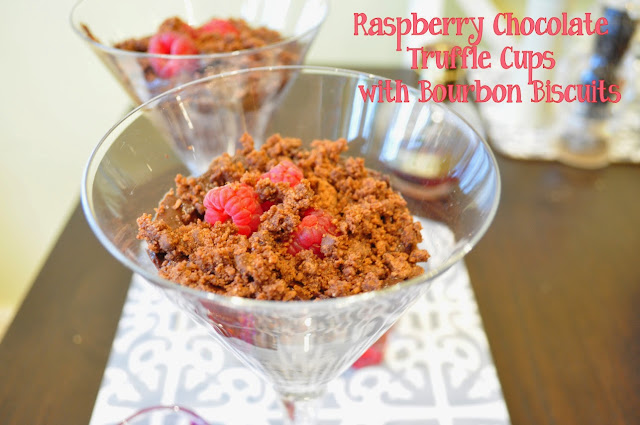
Raspberry Chocolate Truffle Cups with Bourbon Biscuits

These are a romantic little treat for a special dinner for two. This recipe makes just two servings which is perfect for a hot date. They are really simple to make and could fool anyone into thinking that they took hours to create. Since they're made almost entirely of chocolate I would make these on the day and leave them out, because if you put them in the fridge they tend to get really hard and will break any glass as you try to dig them out. Enjoy!
Lindt Dark Chocolate Raspberry Truffle cups
Delicious and Creamy!

Ingredients:
100g Lindt Excellence 70% dark chocolate
1 tsp. Vanilla extract
1/3 c. double cream
10-12 fresh raspberries
6 Bourbon biscuits (or any chocolate biscuits)
25g melted butter

let hot cream melt the chocolateTo Start:
Get the chocolate going, bash up the bar into lots of little pieces.
Heat the cream very very gently until hot but not boiling.
Pour over the chocolate and let sit for about 20 minutes before stirring.
After it's sat, stir vigorously until a light thick consistency.
Set aside.

To Cup It:
Melt the butter.
Blitz the biscuits (including filling), including the filling.
Mix the melted butter in with the biscuits until thoroughly mixed.
Press half the biscuit mixture between two ramekins or glasses.
Add a couple of raspberries and press down firmly.
Divide the truffle mixture between the two containers and smooth out on top.
Add the remaining raspberries to the glasses, and top with the remaining biscuit mixture.
These do get quite hard so I would leave them out before serving for a while.

Friday 6 February 2015

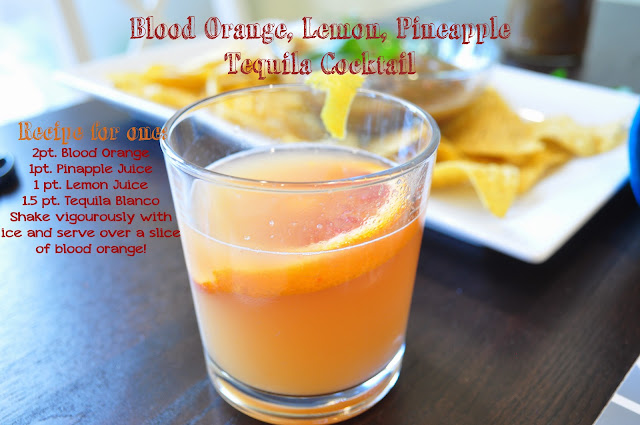
Blood Orange, Lemon, Pineapple and Tequila Cocktail

Hello! Today is Friday and with the crazy week I've had I think I deserve a cocktail. I don't actually thinkg I've blogged a cocktail even though I absolutely love a cocktail. This one is super simple it doesn't really require any explaination at all. It's simple because blood oranges are in season and it's a fantastic excuse to use the juice in a vibrant way and especially with some tequila. I use tequila blanco in this one because I prefer the cleaner purer flavour to respado or any other tequilas. It's quite pricey but I would use whatever tequila you enjoy! This is for one and can be easily doubled or trippled depending on how many you're serving. Enjoy!
blood orange, pineapple, lemon, tequila, cocktail
Blood Oranges are just in season!

Ingredients:
blood orange, pineapple, lemon, tequila, cocktail
2pt Fresh blood orange juice (you can use regular orange juice)
1pt Waitrose Fresh pineapple juice
1pt Fresh lemon juice
1.5 pt tequila blanco
Ice
Shaker
Slice of blood orange
Lemon rind slices for garnish

Method:
Add the ice to a shaker and all the ingredients.
Shake vigorously and serve immediately over a slice of blood orange.

Monday 2 February 2015

Oatmeal Blueberry Cookies with Lemon and Cinnamon

Who doesn't love cookies? These are one of my favourite to go to when I am feeling like a cookie. They're soft and thick and chewy. I adapted the recipe from this one. I decided to lift up the flavours with a big punch of cinnamon and lemon. I absolutely love em now! So much more. These are also my DH favourite cookies, and he's a sucker for blueberries so it's a win win all around! Try em, they're easy and tasty.

oatmeal blueberry cookies with lemon and cinnamon
Raspberries would work good too!


Ingredients:
100g butter softened
200g dark brown sugar
150g oats
125g self-rising flour
1 large egg
1 ½ tsp. ground cinnamon
½ tsp. salt
½ tsp. baking soda
½ tsp. baking powder
200g frozen or fresh blueberries (raspberries would work well too!)
Zest of one lemon
Juice of half a lemon (approx. 1 tbsp.)

To Start:
Sift the flour baking soda, cinnamon, baking powder, and salt in a small bowl.
In a larger bowl cream together softened butter, sugar, lemon juice, zest and egg until light and fluffy.
Slowly combine the flour mixture with the wet mixture until smooth.
When combined slowly add in the berries and oats until well combined.

To bake:

I get about 14-18 cookies with a heaped table spoon on a cookie sheet.
Bake at 175C or 350F for about 12 minutes.
Check frequently because all ovens vary.
I like my cookies a bit underdone and chewy so 12 minutes works for me.
Allow to cool completely before eating.