Showing posts with label low fat. Show all posts

Wednesday, 21 May 2014

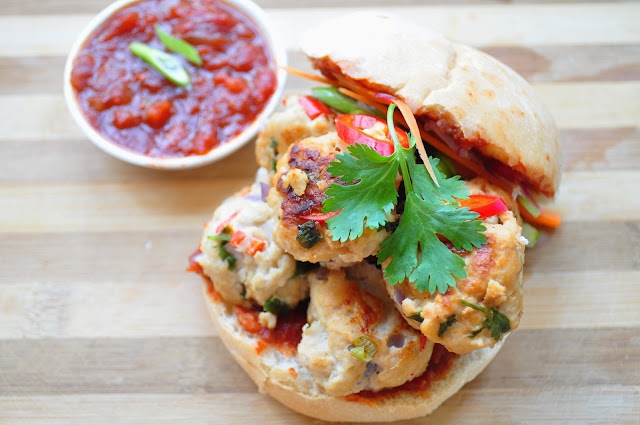
Vietnamese Meatball Buns with a Spicy Tomato Sauce

I’ve been experimenting with meatballs lately. I had some ground turkey and I wanted to make some Vietnamese flavoured ones; ideally they would have gone better with pork, but I only had turkey! They turned out fantastic! I really loved them. They’re basically my take on a bánh mì sandwich. Of course I also didn’t have any baguette either, but I had buns and it worked!! The flavours were all there. I even pickled some carrots and cucumber to give it an extra crunch, since the meatballs are soft. Top with fresh chillies and coriander you’ve got yourself a massive punch of flavour! As an added bonus I’m including the recipe for the spicy tomato sauce I made to go on the bread, if you’re feeling up to it turns into a delicious thick ketchup type of sauce, thick and glorious, wonderful on many things! This recipe can serve 2-3 depending on how many meatballs you make. I got 18 small meatballs out of this, and can fit about six in a sandwich. Enjoy!
Vietnamese Meatball Buns
My take on a bánh mì!

Ingredients:
250g turkey breast mince
1 small red onion
1 chilli (or half depending on how hot they are)
1 tbsp. freshly grated ginger
2 garlic cloves also grated to a puree
1 spring onion
Small handful fresh coriander
Dash sesame oil
1-2 tbsp. soy sauce
50g bread crumbs soaked in a little milk
1 egg white

To start: (If you’re making the sauce, I would recommend starting that first; see bottom)
Dice finely, small red onion, chilli, coriander and spring onion.
Grate the ginger and garlic into a paste.
In a bowl, mix together minced turkey, soy sauce, sesame oil, bread crumbs, egg white and diced vegetables including ginger and garlic.
Mix thoroughly; hands are best here!

To Cook:
I used a non-stick skillet so I’m able to not use oil, if you’re using oil, only use a tablespoon or two to get it done.
Get the pan on high heat, while it’s heating make your meatballs.
It helps me if you get your hands wet before you dive into the mixture to make the balls.
Form into small 1-2 inch balls and set aside.
When the pan is hot, set them down and fry to get a good colour on them.
Try not to turn them before they’ve got the proper brown color because they’ll just stick and pull apart.
I like to put a bit of water in the pan and cover with a tight lid for a few minutes until they’re done.
Since they are small they will cook really fast.
When they’re done pop some sauce on a bun and get them in your tummy!

Note:
If you would like to pickle some vegetables to go with the sandwich all you need is the 1:1 ratio sugar to white vinegar. I use slightly less sugar because I prefer the punch of the vinegar.
Heat up the sugar vinegar mixture until the sugar is dissolved.
Slice some vegetables like carrot, cucumber, chillies and red onion finely and place in the solution and sit for about 20-30 minutes. Enjoy!


Spicy Asian Tomato Sauce

To be honest, I know that tomato isn’t a base for many sauces in Asian cuisine but I wanted to make a thick bbq like sauce. This is dead simple, all you have to do is dump all of these ingredients into a pan, bring up to a boil and simmer for about an hour until it’s thick and syrupy.

Ingredients:
1 400g tin of chopped tomatoes
1 tbsp. hoisin sauce
2 tbsp. soy sauce
1 tbsp. fish sauce
3 tbsp. honey
1 onion diced
3 cloves garlic diced or grated
1 knob ginger grated to a paste
1 tbsp. Chinese five spice
½ tsp. red chilli flakes (I used the hot Korean kind)

Friday, 13 September 2013

Simple Kale and Chickpea Salad

I got a bunch of kale in my veg box yesterday. It wasn't planned, it was supposed to come last week, needless to say I had to think of something to do with it. When I've previously tried it I stewed it down and I felt it was a bit boring. Instead of doing that again I decided to see if salting it would soften it enough to just make it into a salad. About 30 minutes later after salting it (lightly), it turned into a lovely salad with some persuasion from some lemon juice. It was a good thing because I ran out of lettuce for a dinner salad and it made a great side dish, healthy and substantial! Serves 2. Enjoy!

Ingredients:
2 c. shredded kale
½ lemon juice only
½ can drained chick peas (~200g)
1 tomato
½ small onion sliced thinly
½ tbsp. Extra virgin olive oil
½ tsp. Freshly ground sea salt

To start:
Shred the kale, place in a bowl and salt. Mix up with your hands and leave for about 30 minutes to break down.
Next slice the onion thinly and chop the tomato.

To finish:
Add the juice of half a lemon, the tomato, chickpeas and onion.
Adjust seasoning as necessary then drizzle on the oil.
Serve now or it can wait out marinading and the flavours get better.

Monday, 19 August 2013

Easy Vegetable Pearl Barley Risotto

I love love love pearl barley. It’s so useful and good for you. I bought it once because I was going through a whole grain and fibre phase, and I ended up using it in a risotto as a substitute for Arborio rice. I absolutely love this and won’t change back to Arborio unless I have a hankering for it. I vary with my garnishes but I generally keep this vegetarian as there’s just no need for any meat. The base of the risotto is below but you can put anything you want in it. Please enjoy, this serves 2 hungry people!

Ingredients
1 ¼ c. pearl barley
1 stalk celery
1 small onion
1 litre vegetable stock ( I use marigold stock powder)
2 tbsp. Philadelphia cream cheese
3 cloves garlic
1 tbsp. oil

My garnishes:
Yellow courgette
Roasted beetroot (If you would like the recipe message me)
Rocket
Cherry tomatoes

To start:
Dice onions and celery, fry in a little oil until soft, about 5 minutes.
Add the barley and stir for a further 2-3 minutes.

To finish:
Add a third of the stock and bring it to a boil. Stirring constantly, turn the heat down to a simmer until most of the liquid is gone. This should take 5-8 minutes.
When the liquid is nearly gone add another third of the liquid and bring to a boil then turn down to a simmer, cover for 5 minutes.
Next taste the barley and see if it’s soft, you want a nice firm texture but it won’t feel weird to chew.
Add half of the remaining stock and cover a further 4 minutes.
To finish add the garlic and the cream cheese, the rest of the stock and stir keep on a simmer with lid on until it’s smooth and done.*

*At this point I added sliced courgettes and cherry tomatoes. The heat will cook the courgettes through and give a nice crisp tastes. Then I top with my roasted beetroot and arugula to serve.

Friday, 31 May 2013

Earthy Roasted Veg Salad with Goats Cheese

Hello all, I might actually be back this time! How are you all doing? I have missed being able to share recipes, but sometimes life happens and you get distracted! Email me if you would like to suggest a recipe or would like me to make something, perhaps you've tasted something of mine and would like the recipe? Today I’m sharing a salad I made during a week night as a meal, it has lots of earthy attributes that will allow you to stay fuller longer and enjoy this ‘salad’ as a midweek dinner, or as a lunch that will be good and be good for you. Enjoy.

Arrange it any way you'd like!
Ingredients:
1 Small butternut squash
300g of fresh beetroot
1 can of green lentils
100g mild goats cheese
Leafy greens for the salad
Juice of about 1 lemon
1 tbsp honey
2-3 tbsp good extra virgin olive oil
Salt and pepper
Oil for roasting

To start:
Preheat oven to 200C (~400F)
Peel butternut squash, scrub beetroot.
Dice both butternut squash and beets to about the same size.
Place on a sheet pan and drizzle with olive oil, sprinkle with salt and pepper. Toss to combine.
Put in oven for about 40 minutes or until fork tender.

Next:
Make the dressing by combining one part lemon juice to two parts olive oil. (I say this bc lemons vary in juice quantity), add the honey, salt and pepper and whisk it up.

To put together:
When the roasted veg is done take out of the oven and cool for a few moments.
Place the salad leaves, lentils on a plate and arrange roasted vegetables around.
Dress the salad and toss and season accordingly.
Dot the plate with the goats cheese.
Serve with crusty bread or soup.

Note: I could add lots of notes to this, but a reminder is, you don’t have to use green lentils, you can use any bean you like. I also recommend making any vinaigrette in a reused mustard jar or something of the like, it makes it so much easier to shake up and store.

Monday, 6 June 2011

Lower Calorie, Lower fat cheesecake! Possible? It just might be..

So, I’m really not the best at baking but I really try to make an effort because sometimes you just want something for dessert. Who doesn’t like cheesecake though?! I did a few trial and errors to get this one right, and I think I’ve just about gotten it right. So if you’d like to try it, this is what I did.
One thing, I don’t have a proper spring form pan yet, so I just experimented with a pie dish. It worked out pretty well, no need for a spring form pan. But if you have one, then great! And this recipe uses no cane sugar, all substitute.


Ingredients for Crust:
1 cup of crushed graham crackers or 100g crushed digestive biscuits
¼ tsp. cinnamon
1 tbsp. sugar substitute (splenda or something, there are tons out there, make sure you use the ones that are spoon for spoon equal, i.e. Not sweet’n’low)
3 tbsp. melted butter (I used flora, which is margarine with extra heart boosters and helps lower cholesterol, and better than just regular butter)

Ingredients for Pie filling:
400grams (10-12oz) Philadelphia light cream cheese (you could use half non-fat and half light)ROOM TEMPERATURE
½ c sugar substitute (65g)
Very tiny pinch of lemon zest, if you’re not careful it’ll be a lemon cheesecake 
1 tsp. good vanilla
3 eggs separated
¼ non-fat Greek yogurt
1 tbsp. sugar additional

To start the crust:
Mix crushed crackers, cinnamon, sugar and butter together until thoroughly incorporated.
Press into a pie dish, and baked at 156C (350F) for 6 minutes.
Take out and let cool. Keep oven on.

For the filling:

Combine cream cheese, sugar, zest, vanilla, 3 egg yolks, and yogurt, and blend until thoroughly mixed.
In another clean bowl beat TWO of the egg whites 2/3rds of the whites, until soft peaks form and add 1 tbsp. sugar.
Fold this into the previous batter gently, and then pour into the pie dish and bake for about 45 minutes until there’s a light golden hue.

Thursday, 26 May 2011

Simple Spanish Rice

Simple Spanish rice
I normally make my rice with white rice, but I decided to try brown basmati. It takes a little longer to cook and needs a tad more water than normal white rice, but I must say this is an excellent example where you need a shallow sauté pan with a tight fitting lid. Ok here we go. This recipe feeds 4.

Ingredients:
½ green pepper
¼ medium onion
¾ cup of brown basmati rice (150g)
2 cloves of garlic
¾ tsp. ground cumin
½ tsp. chilli powder
1 tsp. light olive oil
Half of a stock cube (I use chicken, but use vegetable or beef if you like)
Half a can of chopped or crushed tomatoes (6oz)
1 ½ c water (375ml) + little extra
Pepper to taste
Couple of shakes of garlic powder
50 grams of cilantro leaves (coriander)

To start Dice all Veggies and set aside:
Pepper
Onion
Garlic

Next, measure out all spices in a small dish. (So you don’t have to mess around with measuring spoons when you’re ready to get going)

Heat the oil in the sauté pan, when hot, combine rice, diced veggies and spices in the pan and lightly brown on medium heat. This stage is important, make sure not to burn but gently brown until the spices become very fragrant. 5-6 minutes.

As the pan is browning, measure out the water and open the tomatoes. Pour tomatoes and water in the pan at the same time with minimal stirring for mixing. Shake on some garlic powder , pepper and cilantro, also crumble the stock cube into the water. Stir a few good times to get mixed and TASTE. Taste is so important, if the broth is not as salty as you’d like it, add some more salt. The broth should taste the way you want the rice to taste.

Bring to a LOW simmer and cover tightly, DON’T TOUCH! Cook for about 20 minutes, if you return to it and the edges of the pan aren’t cooked enough give it a big stir and add a tad more water if dry and let it go another 5 minutes.

Turn the heat off and let it steam itself to perfection, and enjoy!

Sunday, 1 May 2011

Might be Better than Mom’s - Turkey Bolognase

As a child, one of my favourite things to eat was spaghetti, sitting in the kitchen handing my mom ingredients or cutting things up for the sauce, the garlic bread, salad… the whole meal was an experience I remember with clarity. As I got older and I would come home to visit, I’d watch the beef fry in the pan and the grease float around the pot...it became a less than appetizing experience for me. So as an adult I had to adapt the recipe for my personal lifestyle, by making vegetable spaghetti, or substituting the beef with ground turkey or even soy mince. But, sometimes it just doesn’t taste like mom’s. Fortunately I feel like I’ve made a good balance between the two, my mom’s and mine, to find something that gives me the homey comfort of mom’s, but done my way.

When I first moved to England the dish they made that was very similar almost exactly the same is “Spaghetti Bolognese”. For testing recipe’s sake I looked through books and made the recipe from traditional ingredients such as beef. After I got it once, it was time to make it mine and take ingredients from its traditional recipe to enhance my own personal recipe. When this happened it became another favourite in my house, and especially for leftovers. It freezes remarkably and is versatile in that you can cook it for multiple guests or cook it to freeze for fast meals during the week. Although I’m in no way stating this recipe is “fast”, if you follow my steps you can cut down on your time so that you can get back to your glass of wine or guests faster. Another change I do to bump up fibre is I use whole wheat pasta, anything you like will work but if I can add some extra nutrition in there I always squeeze it in, as long as it doesn’t sacrifice too much of the flavour, but I find that I quite like it and I’d even go as far as to say that I like it better. Again, this recipe has a lot of ingredients, and can be changed any way you like, it’s the technique and steps for preparation that make it important, and if you wanted to make it vegetarian with soy mince, or just vegetables, I would omit the wine from the recipe and just drink it instead :) So without further ado.

Turkey Bolognese:

500g (1lb) Ground turkey mince
1 large carrot (or 1-2 small)
2 stalks celery
1 medium green pepper
1 medium onion
2-3 cloves garlic
1tsp dried oregano
1tsp dried basil
2 400g (15oz) cans diced tomatoes
2 cups beef stock (Low Sodium)
1 large glass of red wine (always use a wine you want to drink during the meal)
200g mushrooms (any type)
2 bay leaves
Salt and pepper
1tbsp sugar
1 tbsp light oil
Pasta 50-75g per person (weighing food really helps keep your proportions realistic)

To Start Dice Veggies and group individually:
  1. Celery
    Carrot
    Onion
    Green pepper
  2. Garlic (I always put it in the middle so it doesn’t burn out the flavour)
  3. Mushrooms (Slice)
Other Prep:

Prepare beef stock (or you can use pre made stock, I usually just use the cubes and hot water)

Pour a large glass of wine

Measure the pasta and get the water on the back burner to get warm

To Cook:

  1. In a large sauce pot heat the oil, then add mince turkey, carrot, celery, onion, and pepper, oregano, basil, and stir until the meat is all browned and the veggies have begun to break down. 
  2. Add the mushrooms, and cook until the mushrooms have softened. Then add garlic, stir for about 2 minutes
  3. Turn up the heat and add wine, stock, tomatoes, bay leaves and stir. Bring to a hard boil and boil for about 5 minutes then reduce to a simmer and stir occasionally until most of the liquid is evaporated (this is important) and all the vegetables are soft and cooked through.
  4. Taste and add as much sugar as you need to balance the acidity.
  5. Salt and Pepper as needed.
This could take anywhere from 1hr to 2hrs depending on how quickly you want to get done with it. At this stage it can just rest and simmer while you entertain guests, make the salad, garlic bread or do other things, sit back enjoy some wine and let it develop itself with delicious deep earthy wine flavour combined with herbs it’ll make it worth the wait. Cooking shouldn’t be a race, but however I do know that with feeding families it’s important to get the food on the table. As long as you follow the steps or use the same ingredients you should be able to adapt it to your cooking style after you get the groove of it. I hope you enjoy eating this as much as I enjoy making it. To adapt it to a vegetarian, use any diced vegetables you want, I like to add frozen spinach, courgettes (zucchini), eggplant (aubergine) anything you could possibly want. If you really wanted to add wine, I would just add less. But other than that it should be very adaptable. Enjoy!

Wednesday, 27 April 2011

To Vegan or Not to Vegan

Ok, so recipe time. In deciding what recipe I was going to post first I went to my most trusted advisor, and he said that he loves this recipe so much it should be the first to go out there. Whenever I ask for help making a shopping list, it’s always, ‘did you get black bean chilli recipe makings?’, and ‘no baby we have some in the freezer still.’ When I first moved to London the idea of adapting all of my old favourite recipes seemed like it might be a bit of a challenge and this one was the first to be made here. But it turned into be the fastest two pot recipe I make, and I’ve only had to substitute a few things. One substitute I’ve not seen here is yellow summer squash, so I’ve resorted to using all Zucchini squash (Courgettes), also the chilli powder here just isn’t up to par as far as my Tex-Mex palate is concerned so I’ve always used a stash that I’ve brought back from the US, or I go to the shops and buy every chilli powder they have and test to make sure which has the right flavour. For the purpose of this blog I’ll tell you what I use and give you suggestions to find your own flavour. Yea so apart from those two things it’s a very simple recipe, and totally vegan (if eaten without the sour cream or cheese garnish), also high in fibre, high protein and LOW FAT.

So, for the ingredients, don’t be scared if it seems like a lot, it’s just a process of developing flavour, and the one thing about cooking is you can’t stress about measuring (too much), if you stress about it a recipe is going to be hard and ridged and there won’t be any fun in making it. Remember this recipe feeds a group of 5+ so if you want cut it in half or it freezes well and makes great leftovers. And one more thing, I’ll try to always post in Metric and American System of measurements for all my friends. Ok here it goes:


Black Bean Chilli

Ingredients:
3 (15oz or 400g) cans of Black Beans (undrained)
2 (15oz or 400g) cans crushed or chopped tomatoes
1 small-medium jar of salsa
1 medium onion
1 medium green/red pepper
3 cloves garlic
2 zucchini (courgette)
1-2 yellow squash (if you can find it, if you can’t find it use a yellow courgette or omit it)
~100g (handful!) of Cilantro (coriander)
3 cloves of garlic
3tbps good chilli powder
Splash of oil to get veggies stir frying
1tsp cumin
Salt/ pepper to taste
White or brown rice cook as you like for serving
Sour cream for garnish
Shredded cheese for garnish

First, open all cans and jars and have available next to pot.

Next, prep and dice these veggies and group them accordingly:
  1. Onion
    Pepper
    Courgettes (Zucchini)
  2. Garlic
  3. Chop cilantro

Then, cook:
Add small amount of oil to a relatively big pot.
When hot add 1st group of veggies until soft and then add garlic.
Stir around until garlic becomes fragrant.
Add all other ingredients, beans, tomatoes, salsa, and spices, chilli powder, cumin and salt and pepper.
Drop in cilantro.
Simmer until everything looks soft and the cilantro has turned from bright green to the colour of the chilli.
Serve over hot fresh rice, with sour cream and cheddar cheese on top.
Omit the sour cream and cheddar for a 100% vegan dish.


This is just one example of something that I make that exudes massive amounts of flavour, uses a lot of ingredients, but doesn’t take a lot of time if you can manage just calm down, and think it through by a series of a few simple processes. This recipe is best tried with a little inhibition, add a little of this, and that to make it taste how you want it, and use what you have to create it and make it your own.