Tuesday, 28 October 2014

Party food: Pecan Crusted Cheese Balls

So if you're like me, at this time of the year you're trying to get ready for all the unexpected events over the next few months. Perhaps you're having a party, or a get together to celebrate the season and want to get ahead of the game and have things prepped for just an occasion. These cheeseballs are so easy to make, and they really are a crowd pleaser. I make mine months in advance and wrap them in cling film and foil and they last up to a year in the freezer! There is tons of variations you could do with this, I was even going to try a goats cheese next year in addition to soft cream cheese. This recipe was inspired by my friend Nichole who really loves the holidays and gave me her own recipe; where she got it I don't know. I tapered it to my own likings and my own ingredients and what I had available to me. I have made these two years in a row and they really are perfect for entertaining. Just take them out of the freezer at least 12hrs ahead of time, you can leave them on the counter and it should be fine. Enjoy!
pecan crusted cheese balls for holidays
Serve with apples, celery and crackers!

Ingredients:
200g room temp. light cream cheese
100g room temp. light cream cheese with chives
2 tbsp. finely chopped fresh chives
150g grated mature cheddar (I use Davidstow lighter)
1 tsp. paprika
½ tsp. smoked paprika
¼ tsp. garlic powder
pinch pepper
pinch cayenne powder
100g chopped pecans

Method:
In a bowl mix together all of the ingredients really well. This will take some time to ensure that the spices are blended properly so take your time.
Place in the freezer for 20-30 minutes to harden.
While the mixture is hardening, chop the pecans finely and lay on a large flat surface like a plate.
Take the bowl out and (I used my clean hands) form two large balls.
Take each ball and roll in pecans and set on cling film.
Wrap carefully in cling film, then in foil and freeze immediately.
This recipe makes 2 large balls suitable for 10ppl.

Thursday, 23 October 2014

Easy Peanut Butter Banoffee Pie

To be clear, I had no idea what a banoffee pie was until I moved to the UK, and I didn’t realize how easy it was to make until I made this one. I have wondered since then why I haven’t made one more often? The traditional way to make it is a biscuit crumb base (like a cheesecake base), then a layer of caramel, bananas, cream and some chocolate on top. I just like the idea of peanut butter and banana so I thought for my first attempt at this banoffee pie I would just go all out and experiment. To be honest I’m not sure if I can bring myself to make it the original way because the added peanut butter was amazing! If you’ve made banoffee pie and like it, this is for you, if you haven’t this is for you, if you want to then this is for you….get it? This recipe is for you! Eat eat eat…but I warn you, try to pawn some of it off before you eat it all yourself. This makes…a serving for one or a few more, depending on how much you want to share!

Peanut butter banoffee
Okay, so it's not the prettiest photo; but it's the best!!

Ingredients:
200g digestive biscuits (or you can use an American pre-made graham cracker crust)
50g melted butter (for the biscuits)
400g tin caramel or make your own
2 tbsp. smooth peanut butter
500ml double cream
2 fresh bananas slightly green still
Dark chocolate for shaving on top

Method:
If you haven’t got a pre-made crust, wiz up the biscuits in a food processor or bash them up into pieces and combine with the melted butter.
Press the crumbs into a pie tin and put in a fridge for 30miniutes.
In a bowl mix the caramel and the peanut butter until smooth.
Take the pie out of the fridge and spread the caramel and peanut butter over the bottom as evenly as possible, you can obviously use as much or a little as you want.
Next slice all of the bananas and lay them on top of the caramel.
Return to the fridge for at least 30 minutes, or until you want to serve it.
When you’re ready to serve it, whip up the double cream until stiff and spread over the top of the bananas.
Grate chocolate on top, slice and serve!

What could be more easy?

Monday, 20 October 2014

Oven Cornflake Fried Chicken and Leek Macaroni and Cheese

I decided that I am going to make one big post so bear with me. This was a weekender meal so it’s not that calorie conscious but I’m completely on the 80/20 perspective where I’m healthy 80% of the time and 20% of the time I’m letting lose and eating some extra calories. I have no idea of the nutritional value down to the calorie but I do know the macaroni and cheese is somewhere in the vicinity of 250 calories a portion.

I had previously made oven fried chicken a long time ago, and I apologize there isn’t a better picture of it. As most bloggers know it’s a curse to blog something you’re eating for dinner because by the time it’s ready you’re starving and you just snap a shot of it and it may or may not be good! But you’ll have to use your imagination. I am a bit annoyed I didn’t get a better photo because I am doing this as a recipe revamp, but to be honest, with the old recipe, no picture might have been better than the actual photo used! This is definitely not fried chicken, but it’s a nice alternative if you’re hankering for something lighter and oven made. This recipe is just for two but can easily be doubled for more. Enjoy!

Oven fried cornflake chicken and leek macaroni and cheese
The chicken is hiding in the back!

Ingredients:
2 bone in chicken breasts
600ml buttermilk
1 tsp. tabasco sauce
1 tsp. Worcestershire sauce
1 egg
6-8 cups crushed corn flakes
1 c. seasoned flour

Mac and Cheese:
125g macaroni pasta
1 large leek
1 clove garlic
300ml milk
50g butter
50g flour
50g low fat cheddar cheese
20g parmesan cheese
50g light Philadelphia cream cheese

To Start:
Pour all of the buttermilk in a bowl and put the chicken in to marinade for at least 5 hours.
When you’re ready to cook your chicken, drain all of the buttermilk from the chicken, wiping off as much as you can but reserve about 150-200ml.
Add to that reserved buttermilk the Worcestershire sauce, tabasco and egg.
Mix thoroughly.
Make sure you have a dish out for dredging the chicken in seasoned flour and a dish with the crushed cornflakes.

To make the Chicken:
Dip the chicken in the flour, coating completely, try to cover all wet areas with flour.
Next dip the breasts into the buttermilk/egg mixture and then into the cornflakes.
Once properly dredged set aside on a foil lined baking tray and bake in a 200C oven for about 45 minutes.

For the Mac’n’Cheese:
Cook the macaroni according to directions and set aside.
Melt the butter in a non-stick pan.
Slice the leeks up finely, and mince the garlic and sauté in the butter until well soft.
While the leeks are cooking, shred all your cheeses and measure out everything.
When the leeks are soft, sprinkle in the flour and stir to combine and cook out the flour; about 3-5 minutes on low heat.
Next add the milk stirring frequently while it thickens.
When it’s thick add in the cheeses, leaving a little parmesan behind for the top.
Taste for seasoning, and mix in the cooked macaroni noodles.
Top with the remaining cheese and add some cornflakes on top if desired.
Bake in a hot oven for 30 minutes or until brown on top.

Thursday, 16 October 2014

Blackberry and Chambord Cupcakes

So all of the last blackberries have been picked and foraged and many of us have put some in jam jars to keep in the coming months. I know I did! I had a random jar lurking around in the fridge and I thought I’d use it up. I’m such a sucker for cupcakes these days, I think it’s because you can pick one up without feeling as guilty as cutting a slice of a huge cake! However this logic works, it proves to be highly illogical because it’s quite easy to get more than one! Never mind. Anyways, I decided to just try some cupcakes, and I made the icing out of a little yogurt milk and icing sugar, and of course some blackberry jam. Really easy to make and you could use any type of jam you like. Makes 6 cupcakes, enjoy!
blackberry and chambord cupcakes
Lovely and moist, perfect with a cuppa!

Ingredients:
80g butter
80g self-rising flour
80g caster sugar
¼ tsp. baking powder
½ tsp. vanilla
Pinch salt
2 eggs
1 tbsp. Chambord (or milk)
¼ c. blackberry jam + 1 tbsp.
50g greek yogurt
Milk
Icing sugar

To Start:
Cream the butter and sugar together until smooth.
Next mix in the vanilla and eggs.
Slowly sift in the flour, salt and baking powder.
Stir well to combine.
Put into muffin tins and bake for about 10-15minutes.

For the Icing:
*The reason I haven’t given exact measurements is because for me this isn’t a science, it’s very little by little adding some and eying it. So with that said….
Add a tablespoon of greek yogurt a tablespoon of milk and keep adding icing sugar and yogurt until it’s the consistency you like.
Add about 1 tsp-1 tbsp. jam to get the colour and consistency you like.
Keep adding sugar until it’s firm enough to ice.

To Finish:
When the cupcakes are out of the oven and cool, take a small teaspoon and dig out a tiny portion of the middle, you don’t have to take much just a little to get a nice blackberry filling.
Dollop a good half tablespoon to tablespoon into the hole keeping it in the middle.
Put the icing in a bag and pipe two large circular layers around the jam and then they’re ready to serve!

Friday, 26 September 2014

Bread Mix Pumpkin Cinnamon Rolls with Cream Cheese Icing

I have been thinking lately that it would be nice to have pumpkin cinnamon rolls. I absolutely adore good cinnamon rolls but they’re definitely few and far between here! I also know that it can be difficult to make the right dough for them. Putting my thinking cap on I thought why I don’t try to make some with some kind of premade dough! Enter; bread mix. I really think I’m on to something here guys; this is a fantastic shortcut that took ages off the time to cook these. Sure the texture is a tiny bit off from those big thick delicious buns from back home but this is all so much easier! The kicker here is that the pumpkin isn’t actually in the dough, I’ve made it so that it’s a spread in between the the rolls so you get it in every bite and I’m sure it’s a bit more prominent than if I had made it in the dough itself. I made my own apple butter for this recipe, because I had some laying around…but you could skip this all together and add ¼ c. more pumpkin and add ½ tsp. cinnamon, ¼ tsp. nutmeg and an eighth of a teaspoon of cloves to replicate the flavour. This makes 9 rolls and they are amaze!

Ingredients:
1 500g white bread mix (I used Wrights)
50g muscovado sugar
50g chopped walnuts
½ c. pumpkin
½ tsp. cinnamon
4 tbsp. apple butter (I made my own)
50g melted butter
2 tbsp. honey
100g icing sugar
100-150ml milk
100g Philadelphia lightest cream cheese

To Start:
Follow the instructions on the bread mix.
While you’re waiting for it to rise in various stages, mix up the pumpkin, apple butter, walnuts, muscovado sugar in a paste.
When the bread mix requires to be put into a loaf pan, this is when you’ll flatten and stretch it out into a big square and get it as big as you can, about 12x12.
Spread the pumpkin mixture all over the stretched out dough and roll up.
Slice into 9 even slices and put into a square dish.
Set to prove for a further 30 minutes in very warm place.

To Bake:
Melt the butter and brush it all over the tops.
Sprinkle with cinnamon and drizzle with honey.
Bake in a 200C oven for about 20 minutes, check as times vary by oven.

For the Icing:
Mix the Philadelphia cream cheese and sugar and milk very carefully until you’ve got a nice runny texture.
Make sure to sieve any lumps out or sieve the sugar before mixing it.
When the cinnamon rolls come out of the oven drizzle the icing all over the hot rolls and eat up!

Wednesday, 17 September 2014

Easy Low Calorie Turkey Breast Curry

Easy, fast, low-calorie turkey breast curry.
Extra special with your favourite chutney's and a dollop of yogurt!

Today I’m sharing a really quick midweek meal. Something I try to do is regulate my portions and calorie intake during the week very rigidly. Sometimes I am really brilliant with it and sometimes not so much! The easiest way for me to get control of calories for the last meal of the day is a half cup of rice topped with something that has been stewed, like a sauce. You can do that using a completely vegetarian palate or a low fat protein such as chicken breast, turkey breast or I even find great success with lean beef in smaller quantities. My secret to keeping the calories low is taking away any fat that I can. My biggest enemy with calories is anything with fat in it. If you have something that has a high fat content or even just a few tablespoons of olive oil, you’re automatically going to be dealing with high calories since fat has a lot of calories. I know that before I started looking at calories and what they translated to in my every day routine, I was shocked at how much oil I was actually using! People say that olive oil is healthy, and while it is; everything in moderation! If you’re not measuring the oil going into your food you can quite easily go overboard. In 1 tablespoon of olive oil there are over 100 calories! If you’re making a one person dish, that’s a lot of calories to part with on your total daily intake; or it is for me anyways!

So with that said, the way I get around it is to boil boil boil! I use a non-stick pan, and I literally toss everything in, bring it to a boil and boil the crap out of it until it’s a thick sauce! No precooking, no heating oil to fry the onions and meat first, none of that! Just toss it in and boil boil boil, keep adding water if it’s not cooked through. Even if you don’t have a great non-stick pan, any large saucepan will work. I’ve found great success in this because you’re also left with a lot of flavour to dive into. I realize that for some things it just takes a bit of time. But if you get home from work and you toss it all in the second you get home bring it to a boil while you’re prepping for a shower, turn it down to medium and cook the crap out of it. My other tip is to stretch everything out with vegetables! Frozen vegetables are particularly the best because they’re completely hassle free and you can have them in ready when you need them. I tend to watch frozen items like peas, and sweetcorn because they tend to generate more calories, but mushrooms, red peppers, onions, green beans are fantastic for this. This recipe makes three portions, and can easily be stretched out for 4-6 with everything doubled. A secret of mine is also LARGE batches! Get those old takeaway containers out because they’re going to be your best friend at making portions correctly. I hope you enjoy!

Ingredients:
500g (1lb) diced turkey breast
1 400g tin chopped tomatoes
1 red pepper
150g button mushrooms
100g frozen peas
30g dried red split lentils
2 tbsp. mango chutney
Handful of coriander (cilantro)
Handfull curry leaves (optional)
2 green cardamom pods
3 whole cloves
1 inch piece cinnamon
2-4 tbsp. curry powder
1 tsp. whole peppercorns
Salt to taste

To Start (This will take appx. 1hr)
Prep all of the veg – cut the peppers, slice the mushrooms, dice the onion.
Take out the peas and weight them.
Weigh out the red lentils.
Gather all spices.

To cook:
Heat a pan really hot. (While you don’t have to add oil, you want to throw everything into a very hot pan.)
Start by throwing in the meat first, then the veggies.
Add in the tinned tomatoes and two cans of water.
Next add the spices, and lentils and peas while it’s coming up to a boil.
Salt lightly because it will develop more salt while cooking.
When it’s up to a rolling boil add in two cloves of garlic and turn to a medium boil and cover.
After about 30 minutes of boiling take off the cover, taste to check seasoning, if it needs more salt, salt it.
At this point add half the mango chutney (1 tbsp.), stir in and continue to cook.
If it’s too watery, turn that flame up high and evaporate the water, if it’s running out of water, add a bit more. Cook until the sauce has reached a consistency you like.
If it’s still too bitter add the remaining 1tbsp. of chutney.
At the final 5 minutes of cooking throw in the last clove of garlic, crushed or diced up.
Serve it up when hot on a bed of rice with some fat free yogurt.

*Note: If you can’t find mango chutney, a few tablespoons of coconut milk would be perfect.

Monday, 15 September 2014

Light Mexican Chorizo

When I moved to England, I couldn’t believe how many things I would miss from home! One of the most missed things is waking up early and getting potato, egg, and chorizo tacos on the way to school twice a week. Sadly there’s no Mexican chorizo to be had in the UK. What they have here is Spanish chorizo which is much different. There are similar flavours in that you’re tasting garlic and paprika, but more smoky paprika in Spanish chorizo. The thing I absolutely don’t miss about Mexican chorizo is the grease! Oh it tastes soo good but it’s not good for you!! There is something comforting in a bit of grease running down your arm while you grasp that taco first thing in the morning. However comforting that is, or might be it’s not for today’s recipe! This is super easy to make, and I haven’t taken any photos of things I’ve made with it but I just portion this recipe into four parts and it feeds two each time. I put it in the freezer and take it out for breakfast tacos, or mix with rice or potatoes for a side or main dish. Enjoy!

Light Mexican Chorizo
The possibilities are endless.

Ingredient List:
500g lean pork mince
3 cloves garlic
2 tbsp. ancho chilli powder
2 tbsp. sweet paprika
1 tbsp. smoked paprika
½ tsp. dried Mexican oregano
¼ tsp. pepper
2 tsp. chilli powder
1 ½ tsp. salt
¼ tsp. cayenne
¼ c. apple cider vinegar
Small pinch cinnamon
Small pinch cloves

Wednesday, 10 September 2014

Homemade Freezer Pesto Cubes

Luckily it’s that time of year where basil is running rampant in everyone’s garden and being grown at high volumes for purchase. Unfortunately, I am not one of those people who can grow lot of anything, except maybe mint. I have a very aggressive mint bush growing right now and it’s threatening to take over. Anyways, back to basil. It’s a really lovely herb and it also freezes really well. A few years ago I took advantage of a huge bag of basil from my local organic veg box scheme Riverford, mostly because I didn’t realize at the time how much 200g of basil was! I had basil everything for a week. When it was running out I decided to figure out how to freeze it which was incredibly easy. I just put the remaining 100g into a food processor and added a little oil and presto pesto. Shove it in some ice cubes and pop it in the freezer. It’s a very simple remedy for any herbs really. They can be popped into any dish frozen; I like to pop them into the last five minutes of a Bolognese sauce or quick pesto pasta for a quick mid-week dinner. The possibilities are absolutely endless.


Easily doubled if necessary.
Takes about 2 seconds to make.
Makes about 18 1 tsp. portions.


Tuesday, 2 September 2014

Low Fat Coronation Chicken Wraps

When I first came to England, I tasted so many interesting things. One thing was this ‘coronation’ flavour. It’s essentially any kind of curry flavoured mayonnaise based mixture that can be a rice salad or a chicken salad or even egg salad. Basically delicious and I wanted to make up a recipe and see how it goes! This recipe makes about 4-6 depending on how big your tortilla wraps are. I think the bigger ones are better. This is also really great for a fabulous picnic with the last few hours of sunshine left in England! Enjoy!
Have you ever had curried chicken wraps?

Ingredients:
500g chicken breast
1 tbsp. madras paste
1 tsp. curry powder
2 tbsp. light mayo
3 tbsp. Greek non-fat yogurt
150g grapes
25g flaked almonds
¼ c. raisins
2 ribs celery
3 spring onions
Salt + pepper
4-6 tortilla wraps

To Start:
Get a pot of water going and boil the chicken breasts for 10-15 minutes until cooked through.
Slice the grapes in halves or quarters depending on size.
Slice thinly the celery and green onions.

To make the Coronation Mayo:
In a medium bowl combine madras paste, curry powder, mayo, yogurt, and salt and pepper. Stir to combine.
Next add in the raisins, almonds, grapes, celery and spring onions.
Mix thoroughly checking for seasoning.

To Finish:
Drain the chicken off and let cool before dicing into chunks.
Fold into the mayo mixture and wrap it in tortillas.
Eat it or pack it away for a picnic!

Wednesday, 27 August 2014

Tiramisu Cupcakes

What can I say? Who doesn't love tiramisu AND cupcakes?! Combine the two and I have a total winner! Seriously, I don’t know where my sweet tooth came from. I think it came from moving to the UK because I never had such a taste for sweets. I had some lady fingers in the cupboard that I as going to make a killer tiramisu recipe out of, but when I was looking at the ingredients, I just was thinking, “Why don’t I try to make cupcakes out of it?” Lately I’ve been on a cupcake kick. Any type of cupcake I want it. Since I’m still improving my baking skills it’s a bit of a hit or miss, but this certainly was a hit! I nearly ate all of the cupcakes I made, luckily I gave some away! There is some alcohol and coffee in this recipe so you can use it as a great excuse not to share any with the kids! This recipe makes 10. Enjoy!
tiramisu cupcakes
Delicious, and for more authentic look, dust with cocoa powder :)


Ingredients:
150g butter soft room temperature
150g self-rising flour
150g caster sugar
3 eggs
½ tsp. baking powder
Pinch salt
½ tsp. vanilla
1 tbsp. strong espresso - cold
1 tbsp. marsala wine

Icing:
125g mascarpone cheese room temperature
50g butter soft
1 tbsp. marsala wine
1 tsp. cocoa powder
300-500g icing sugar

To Start:
Heat oven to 180C
Cream together butter sugar and eggs until light and fluffy.
Next add in the vanilla, espresso and marsala wine.
In another bowl sift together salt, baking powder and flour.
Mix in with the wet ingredients a little at a time until everything is incorporated.

To cook:
Bake the oven for about 12-15 minutes or until a toothpick is inserted clean. Oven times vary so watch them closely.

For the icing:
Make sure that everything is room temperature.
First cream together the butter mascarpone cheese.
Sift in the cocoa and mix to combine.
Next add in the espresso and the marsala wine mix until creamy.
Add icing sugar a little at a time until it becomes a thick consistency that you would like to ice the cakes.
Ice and enjoy!

Friday, 22 August 2014

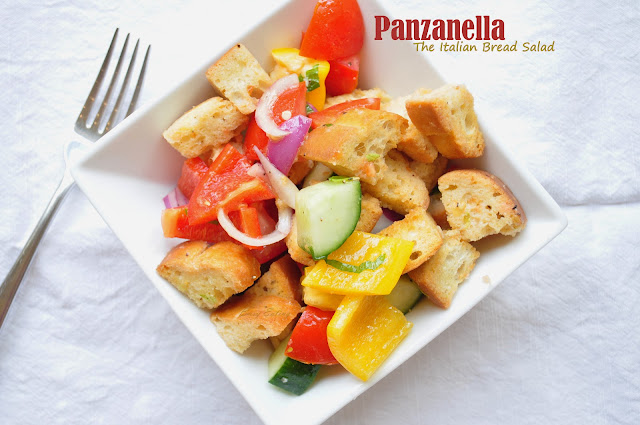
Easy Fresh Panzanella with Mint and Marjoram

What is it? It’s an Italian bread salad, made with hot croutons freshly made, then sauced up with a delicious vinaigrette and fresh veggies and herbs. It’s absolutely delicious on a hot day or easily taken on a picnic. I bet it would even go nicely with a grilled piece of chicken or fish. I got the herbs from my garden but you traditionally use basil, but since I didn’t have any I just improvised and it was fantastic. It’s best when the croutons are fresh hot out of the oven, but just as delicious after resting at room temperature. This recipe makes about 4 servings but you can easily double it for 4 large portions. Enjoy!
italian panzanella with mint and marjoram
Fresh and healthy!

Ingredients:
200g baguette (rustic baguette preferred and slightly stale)
2-3 medium tomatoes
1 small red onion sliced finely
½ yellow pepper sliced
½ red pepper sliced
½ long cucumber
4 tbsp. olive oil (1 for toasting, 3 for dressing)
½ tsp. Dijon mustard
3 tbsp. white wine vinegar
1 clove garlic
Few sprigs mint and marjoram
Salt and pepper

To start:
Cut the baguette into 1x1inch cubes. Make sure your bread is crusty and stale if it isn’t cut into cubes and leave to rest for 1hr before toasting.
Drizzle 1 tbsp. of olive oil around and salt and pepper tossing it with your fingers to combine.
Put in a 200F oven for about 10 minutes, watch them so they don’t burn!

For the Salad:
Dice the tomatoes, peppers and cucumbers in nice big chunks.
Make sure the onions are sliced finely.
Finely chop the herbs
Salt and leave aside.

For the Dressing:
Whisk 3 tbsp. oil, vinegar, Dijon mustard, garlic until well combined.
Add the herbs and stir.

To Combine the Salad:
When the croutons are hot out of the oven mix them with the vegetables.
Next dress the salad with the dressing and stir to combine.
Stir well so that the dressing gets absorbed by all of the croutons.
Enjoy!

Tuesday, 19 August 2014

Slow Cooker Spanish-Style Chorizo and Squid Stew

I bought a slow cooker a few months ago, and sometimes it comes in really handy! I prefer to cook things on my own, but when you’re going out and you just want to throw some dinner in a pot, it’s a great way to save some time! I knew that I wanted to use this method with this recipe in particular because I was using squid. I know that the rule with squid is to either cook it really fast or to cook it really slowly and for a long period. What better way to use the slow cooker then! I really enjoyed this stew, but my hub enjoyed it too! He’s not really a fish eater and kind of frowned when he found out it was chorizo AND squid. I cooked it all day for about 5-8hours and it had a really lovely depth of flavour. The one downside to this recipe is I used white wine which I had to cook out in the beginning of the cooking; if you don’t it probably will have a weird funky alcoholic taste so I decided to cook it off beforehand. Try it! In a medium slow cooker it serves about 5. Enjoy!
slow cooker chorizo and squid stew
Lovely with a bit of crusty bread.

Ingredients:
150g chorizo (half of a ring)
200g fresh squid
1 large onion
1 red pepper
1 chilli or two if you’re feeling spicy
1 400g tin chick peas
1 400g tin chopped tomatoes
1 Knorr fish stock pot (use 4c. fish stock if you don’t have this)
1 large glass white wine (250ml)
1 can of water
Pinch saffron
1-2 cloves garlic
Green Spanish olives

To Start:
Slice the red pepper, chilli, fresh squid, and add to the slow cooker.
Add the chopped tomatoes and chick peas (undrained), along with an extra can of water.
Turn on the slow cooker to high.

For the Cooking Part:
Heat a frying pan until well hot.
Slice the chorizo and onion into thin slices and add to the hot pan.
Stir around until the chorizo renders some fat and smells fragrant.
Next add the white wine, stock cube and pinch of saffron, cook for about 5 minutes.
Add all of the chorizo onion and wine mixture to the slow cooker.
Finish in the slow cooker with a few cloves of garlic and green olives.
Put the lid on and leave for 1hr on high, then turn down to low for the remaining 5 hours of cooking.

Note: The cooking time is only dependent on what time you have. You can easily start this from low, I just wanted to get some heat going through before I left it alone.


The 21st Century Housewife Hearth and Soul Blog HopApril J Harris of the 21st Century Housewife

Friday, 15 August 2014

Middle Eastern Style Veggie Burgers with Pickled Red Onions

This is a recipe revamp from my old collection. I previously called them baba ghanoush veggie patties but I realized when I was retesting the patties that they’re much broader than that because they’ve got goats cheese in them. Regardless of that they still came out just as delicious as before. I also wanted to add some zing to them, and made some pickled onions to go with the patties. These are amazing and can go with anything. They’re much like the pickles you’d find in Texas on carnitas tacos. I also used them to serve alongside some pulled pork. They’re pretty versatile and really nice to snack on. The recipe for the burgers makes about 6.
Middle Eastern Style Veggie Burgers
Delicious in a burger or on it's own.

Ingredients:
1 400g tin cannellini beans – drained and dried
1 medium aubergine
1 medium red pepper
125g goat cheese
50-75 bread crumbs (Or 2-3 slices of white bread whizzed up in the food processor)
1 egg
½ tsp. garlic powder
½ tsp. cumin
¼. tsp. paprika
¼ tsp. turmeric
Salt to taste
Handful of cilantro
Oil to fry

To start:
Slice the eggplant and red pepper in half, roast in the oven with a little oil until soft and mushy.
Drain the beans and rinse. Drain thoroughly.
In a food processor whiz the beans, goats cheese, roasted aubergine, red pepper and spices and half of the bread crumbs.
When combined add the egg and whiz again.
Depending on how wet this batter is adding some more breadcrumbs as needed. The consistency you’re looking for is of thick pancake batter.

To cook:
Heat a couple of tablespoons in a pan until very hot.
You’ll want to spoon the batter in the hot oil.
Make the patties the size you desire and cook for 3-5 minutes on each side.
These will be very delicate so take care when flipping.

For the pickled onions: (Note: Adapted recipe from here.)
100g thinly sliced red onions
1 medium cinnamon stick
½ tsp. red pepper flakes
Juice of one lime – if it’s not juicy enough use two.
1 c. apple cider vinegar
75g caster sugar
1 tablespoon salt

Method:
In a small saucepan bring all of the ingredients slowly up to a bowl so that the spices have time to steep and the sugar has time to dissolve.
Blanch the onions for 10 seconds with freshly boiled water and drain immediately.
Shove the onions into a jar.
When the sugar is dissolved in the brine pour carefully over the onions and let sit until room temperature.
When cool cover and refrigerate for up to a week.
After 10 minutes in brine it's ready!

Wednesday, 13 August 2014

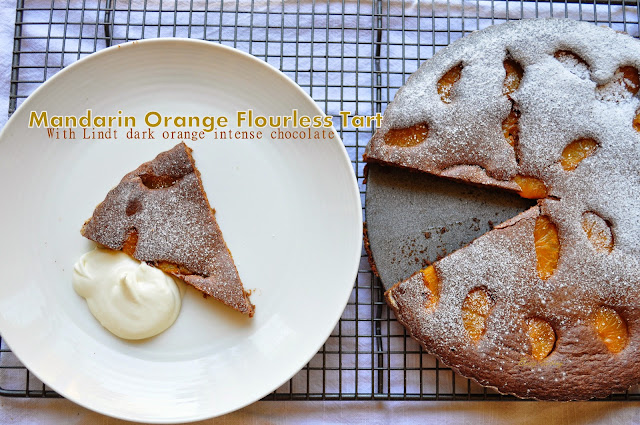
Flourless Chocolate Tart with Lindt Dark Chocolate and Mandarin Oranges

Baking is one of my new favourite things to do, except when it’s really hot in summer! Thankfully in the UK we’ve had a bit of fresh cool air stroll in so it’s not too bad having the oven on. I was looking for inspiration for some kind of chocolate tart when I came across something similar to this. I put my own stamp on it, using mandarin oranges and orange chocolate. It’s really decadent and delicious. The best part about it is it’s flourless so all those gluten free folks can enjoy it as well. There’s also a little bit of brandy in it to give it some richness. Try your hand at making it; it’s got the stamp of approval from the Brits. Makes about 8 slices.

Gluten free flourless chocolate tart with orange
Moist and lovely with a bit of cream.

Ingredients:
100g Lindt dark chocolate orange
100g unsalted butter
100g ground almonds
3 eggs separated
1-2 tbsp. Gran Marnier
45g half spoon granulated sugar (*NOTE: If using regular sugar use 100grams)
200g tinned mandarin orange segments drained

To Start:
Heat your oven to 180C
Break the chocolate up and add with butter to a microwave safe bowl and melt.
Make sure to cover the bowl or else you’ll have butter all over the microwave!
Take out stir to combine and add the brandy and let cool.

Next:
Separate the eggs and beat the yolks with the sugar until light and fluffy.
Add the ground almonds and stir to combine.
By now the chocolate and butter should be cool enough to whisky
Next beat the egg whites until they reach soft fluffy peaks.
Carefully fold in half of the egg whites into the batter trying not to release all the air from the eggs.
Fold in the second half and set aside.

To Finish:
Butter and sugar a removable tart tin and place on a baking sheet
Pour the batter into the tart tin.
Take your mandarin oranges and place them in whatever pattern you’d like. Make sure they are thoroughly drained before doing so.
Bake for about 30-45 minutes depending on your oven, allow to cool before slicing.
Serve with cream or ice cream.

Friday, 8 August 2014

Curried Piccalilli Scotch Eggs with Curry Ketchup

Who doesn’t love a scotch egg? I know I do! I have made a few attempts at making them but it always turned into a disaster. I watched a few videos on how to do the breading and I think I have it down! I wanted to incorporate the traditional dip ‘piccalilli’, that goes with scotch eggs, into the actual sausage meat. If you’re willing to take a little time to make these they make great picnic accompaniments. They’re rather large so you can assume it will fill you up! I could easily split one with someone else on a picnic. This recipe makes 4, and unfortunately it’s hard to make them any smaller because the eggs are quite large to begin with. It was a bit of a messy job making these so it was harder to photo the entire process, so I only have the end result. Enjoy!
Curried Piccalilli Scotch Eggs
Delicious oozy runny yolks :)

Ingredients:
500g lean pork mince
200g piccalilli (chopped up very finely)
8 large eggs (4 for breading 4 for boiling)
2 tbsp. curry powder (reserve 1 tsp. for the curry ketchup)
4 large eggs
200g bread crumbs (or about 5 cups)
150g seasoned flour
Oil for frying
Cling film
½ c. ketchup to serve

To Start:
Get on a pot of water to boil.
When the water is boiling gently put the eggs in and boil for six minutes exactly. Take out and run under cold water; peel and set aside.

To Prep:
Pull out 4 large pieces of cling film; set aside.
Make breading stations, 3 bowls with b
Next chop the piccalilli as fine as you can and mix it with the pork mince.
Divide in four equal portions.
Place one portion on a piece of cling film and press out into a circle.
Place the egg in the middle and bring the cling film together, twisting tight and bring the meat to the egg covered completely.
Repeat for all eggs, and refrigerate for 1hr.

To Bread: (THE MESSY PART)
Take the chilled sausage and eggs out of the fridge, dip in the flour first, then into the egg, then into the bread crumbs.
From the bread crumbs, toss back into the egg to coat, and then back into the breadcrumbs.
Set aside while you do the others, and refrigerate for another 30 minutes.

To Cook:
Heat your oil to about 180C – I did not have a temperature gadget so I just eyed it.
They should take about 6-8 minutes until golden brown.
When done remove and let sit on a paper towel for 20 minutes before digging in as they are hot!

For the curry ketchup:
In a small saucepan, heat up the ketchup and 1 tsp. of curry powder just until heated through.
Let cool and use for dipping the egg!

Wednesday, 6 August 2014

Moist Raspberry Blueberry Bundt Cake with Lemon and Greek Yogurt

I made this cake last year and decided to tweak it a little to my needs. It was inspired by a blueberry bundt cake I found online and tweaked it then I tested it on my husband, and before he tasted it I gave some to my neighbour to taste. Both of them told me that they didn’t want to share it and that I should make more! It was by far the moistest cake I’ve ever made from scratch and I was really impressed at my own skills, which are completely null when baking! IF you want to impress your guests, or family, and are not an especially great baker this is the cake for you. It’s absolutely gorgeous with a cup of tea! Makes about 16 servings.
Rasberry Blueberry Bundt cake with Lemon and Greek Yogurt
Delicious and Moist!

Ingredients:
300g self-rising flour
225g room temperature butter
200g dark brown sugar
100g Half spoon granulated sugar (**If using regular sugar use 200g)
½ tsp. salt
1 tsp. baking powder
1 cup zero fat Greek Yogurt
4 eggs
1 tsp. vanilla
Zest and juice of two lemons (one lemon if it’s big)
400g frozen berries (blueberry/raspberry)

To Start:
Pre-heat oven to 180C (350F)
Sift 275g flour, salt, baking powder in a bowl and set aside.
Cream together butter and sugars until light and fluffy in a large bowl.
Zest and juice the lemon into a bowl, mix with yogurt and vanilla.
Next add the yogurt mixture to the butter and sugar and stir until thoroughly incorporated.
Follow by adding one egg at a time until completely combined.
When combined add half of the flour mixture and when combined add the rest until mixed.

To Finish:
Mix the berries with the remaining flour and fold them into the batter.
Pour into a greased bundt pan, and put into a hot oven.
Bake for 40-50 minutes. Every oven is different so after 40 minutes prick with a tooth pick.
You can top this with any kind of sugar glaze or eat on its own. I prefer it on its own!
Perfect and moist with a cup of tea!

Thursday, 5 June 2014

Orange Chilli Beef

Sometimes you want some takeaway but don’t want to go out because you know you can technically whip together a stirfry. If this happens to you this might be the perfect recipe for you. Sometimes I feel like I really don’t want to cook but I have ingredients in my cupboard and I’m able to pull something together that is far superior and far healthier than a local takeaway. This gave me the satisfaction of an ooey gooey sauce that I always find so moreish about Chinese takeaway, and there’s a lovely sweet sticky element that coats everything that brings my tummy happiness. There’s literally nothing to this recipe, if you’re prepared from the start of a meal everything can be very simple. In this case I used some cheap frying steak, and to get it tender I fry it first with onions and a little water before I add anything else in, you can use any type of beef you want, whatever works for you I say go for it! I also use a non-stick pan and am able to get away without using any oil to cook with which is fantastic for watching calories. I thoroughly recommend anyone investing in one, mine is a Le Creuset. Anyways, this recipe feeds 2-3. Enjoy!


Orange Chilli Beef

Ingredients:
350g beef fry steak in thin strips
1 onion
3 large carrots
200g mushrooms
1 green or red pepper
1 chilli or however many you like
4 cloves garlic
1 bunch spring onions
3 tbsp. soy sauce
Juice and zest of one lemon + ¼ c. orange juice if orange isn’t juicy
1 tbsp. honey
1 ½ tbsp. corn flour
½ c. water
Rice to serve

To Start:
If you haven’t started your rice do so now.
Peel and slice your carrots.
Slice mushrooms, spring onion, pepper, chilli, onion, and garlic.
In a bowl, mix together corn flour 2 tbsp. soy sauce, orange juice and zest, water and honey; mix and set aside.

To cook:
In a large pan heat oil if you’re using it, add the beef and the onion, and a little water, cover it and simmer on medium for about 10-15 minutes.
Next add in the pepper, carrot and turn up the heat to high and keep uncovered at this point.
Add in the garlic, and remaining tablespoon of soy sauce.
Add in the chilli and mushrooms. Cook for 5 minutes. It’s important to cook the veg to your liking, I like mine crispy still.
Stir the sauce, and turn down the heat. If it gets too thick add some water.
Finish with the spring onions and serve over rice!

Wednesday, 28 May 2014

Warm Broad Bean Potato Salad with Mint, Marjoram, Garlic and Lemon

We’re just on the cusp of broad bean season! I can’t wait, I absolutely love broad beans. I got my hands on some of the first ones at the supermarket and they were delicious. They happened to be babies but I love them nice and tender. The only thing about them when they’re that small is they are a bit more tedious to peel. I peeled mine for the purposes of this lovely picture but generally I can’t be bothered to go through all of that! If you want to do it fast, keep your beans in the freezer, boil a kettle and soak them for a few minutes under the boiled water. They should pop out of the case very fast. I wanted to try something fresh, and there’s nothing fresher than fresh boiled new potatoes boiled until al dente and tossed with a few humble ingredients. Simplicity at its best…this serves about four people as a side dish and as a vegetarian main course two. Enjoy!
Warm broad bean potato salad with mint, peas, marjoram, lemon and garlic.
Broad beans and mint are best friends!

Ingredients:
600g new potatoes boiled till al dente
100g frozen peas
150g broad beans shelled
1 tbsp. good olive oil
Zest of one lemon
Handful mint and marjoram
Garlic cloves
Salt

To Assemble:
Get the potatoes boiling and peel the broad beans.
Zest the lemon and chop the herbs.
Crush as much garlic as you are happy to eat!
Put the frozen peas in a colander and drain the potatoes over them to thaw.
Mix the hot potatoes with the olive oil, lemon zest, garlic and herbs.
Serve immediately, or is okay served room temp or even cold!

Wednesday, 21 May 2014

Vietnamese Meatball Buns with a Spicy Tomato Sauce

I’ve been experimenting with meatballs lately. I had some ground turkey and I wanted to make some Vietnamese flavoured ones; ideally they would have gone better with pork, but I only had turkey! They turned out fantastic! I really loved them. They’re basically my take on a bánh mì sandwich. Of course I also didn’t have any baguette either, but I had buns and it worked!! The flavours were all there. I even pickled some carrots and cucumber to give it an extra crunch, since the meatballs are soft. Top with fresh chillies and coriander you’ve got yourself a massive punch of flavour! As an added bonus I’m including the recipe for the spicy tomato sauce I made to go on the bread, if you’re feeling up to it turns into a delicious thick ketchup type of sauce, thick and glorious, wonderful on many things! This recipe can serve 2-3 depending on how many meatballs you make. I got 18 small meatballs out of this, and can fit about six in a sandwich. Enjoy!
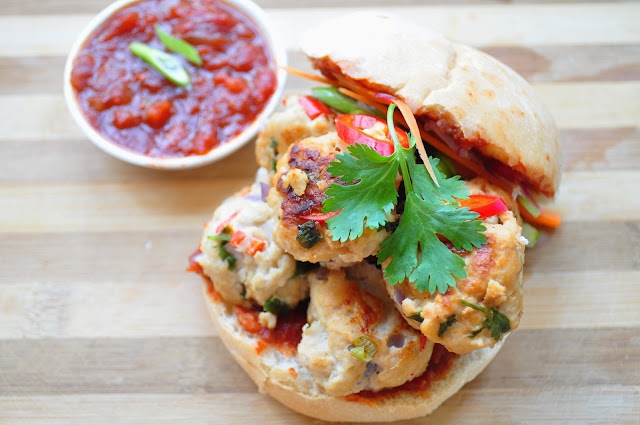
Vietnamese Meatball Buns
My take on a bánh mì!

Ingredients:
250g turkey breast mince
1 small red onion
1 chilli (or half depending on how hot they are)
1 tbsp. freshly grated ginger
2 garlic cloves also grated to a puree
1 spring onion
Small handful fresh coriander
Dash sesame oil
1-2 tbsp. soy sauce
50g bread crumbs soaked in a little milk
1 egg white

To start: (If you’re making the sauce, I would recommend starting that first; see bottom)
Dice finely, small red onion, chilli, coriander and spring onion.
Grate the ginger and garlic into a paste.
In a bowl, mix together minced turkey, soy sauce, sesame oil, bread crumbs, egg white and diced vegetables including ginger and garlic.
Mix thoroughly; hands are best here!

To Cook:
I used a non-stick skillet so I’m able to not use oil, if you’re using oil, only use a tablespoon or two to get it done.
Get the pan on high heat, while it’s heating make your meatballs.
It helps me if you get your hands wet before you dive into the mixture to make the balls.
Form into small 1-2 inch balls and set aside.
When the pan is hot, set them down and fry to get a good colour on them.
Try not to turn them before they’ve got the proper brown color because they’ll just stick and pull apart.
I like to put a bit of water in the pan and cover with a tight lid for a few minutes until they’re done.
Since they are small they will cook really fast.
When they’re done pop some sauce on a bun and get them in your tummy!

Note:
If you would like to pickle some vegetables to go with the sandwich all you need is the 1:1 ratio sugar to white vinegar. I use slightly less sugar because I prefer the punch of the vinegar.
Heat up the sugar vinegar mixture until the sugar is dissolved.
Slice some vegetables like carrot, cucumber, chillies and red onion finely and place in the solution and sit for about 20-30 minutes. Enjoy!


Spicy Asian Tomato Sauce

To be honest, I know that tomato isn’t a base for many sauces in Asian cuisine but I wanted to make a thick bbq like sauce. This is dead simple, all you have to do is dump all of these ingredients into a pan, bring up to a boil and simmer for about an hour until it’s thick and syrupy.

Ingredients:
1 400g tin of chopped tomatoes
1 tbsp. hoisin sauce
2 tbsp. soy sauce
1 tbsp. fish sauce
3 tbsp. honey
1 onion diced
3 cloves garlic diced or grated
1 knob ginger grated to a paste
1 tbsp. Chinese five spice
½ tsp. red chilli flakes (I used the hot Korean kind)

Friday, 16 May 2014

Carne Guisada - A Tex-Mex Classic!

I made this recipe a few years ago and blogged about it, but I haven't made it since and I wanted to revisit the recipe, and tweak things and make it work again! In my childhood it was something I ate quite often. If it wasn't for my mother making it for me, I would be getting tacos at the local shop. It’s absolutely delicious and I never really thought about how it compares to other food in other countries. It really ends up being a stew, so I guess I would describe it as a Mexican stew. I even thought when I was done with it that it would be fantastic in a pie with a crust on it! Instead I went for tortillas, which will be cited below as a recipe. This is a simple dish made with cheap cuts of beef, stewed over a long period of time to make it completely tender and juicy. It’s easy to put this one on to cook and forget it, or you could even start it in a slow cooker although that wouldn’t be my personal preference. I decided to re-vamp the recipe and check all of the cooking times; the old recipe for reference is found here. There isn’t much I would change other than cooking it out a little longer. Depending on how you’re using this recipe, IE pie, or tacos or just simply on its own it can yield 2-4 servings.
Carne Guisada - Tex-Mex Classic
Served with hot fresh tortillas :)

Ingredients:
400-500g lean diced stewing beef
2 green/red peppers
25g flour (about ¼ c.)
2 tbsp. tomato puree
4 cloves garlic
300ml water or beef stock
1 tbsp. cumin powder
1 tsp. Mexican dried oregano (regular oregano is fine)
½ tsp ground pepper
Salt to taste
Oil (if not using a non-stick pan)

To Start:
I don’t need oil because I use a non-stick pan, but if you aren’t, then heat oil in a large sauté pan.
Start to brown off the meat in a hot pan
Slice onions thinly along with the peppers.
Chop garlic – set aside.
Add to the pan and salt a bit to bring out some liquid.

To Finish:
When the peppers and onions have softened a bit add the garlic, cumin, oregano and flour.
Push the flour around in the pan for about 5 minutes cooking off the flour taste.
Next add the water/stock, and tomato puree, stir until well combined.
Bring to a boil, then reduce to low, cover and simmer for 1-2hrs.

Note: It’s easy for the liquid to evaporate so keep adding a little more in ¼ c. increments as needed every half hour or so. The meat will be done when the meat is tender and the sauce is a thick consistency. Happy cooking!